Showing posts with label audio. Show all posts
Showing posts with label audio. Show all posts

03 April 2026
How to convert .wav files into .mp3 ones?
Converting WAV to MP3 (Offline)
If you need an MP3 file instead of WAV, use
lame:- Install Lame:
sudo apt-get install lame - Convert:
lame -V2 output.wav output.mp3
How can I convert a text file into an audio file without internet access on ubuntu?
$ pip install piper-tts
Since you installed it via pip, you can use the piper command directly in your terminal. Because Piper is a "neural" text-to-speech engine, it doesn't come with voices built-in; you have to provide a model file (.onnx) and its configuration file (.json).
Here is the workflow to convert your text file:
1. Get a Voice Model
If you haven't already, download a voice from the official repository. You need both files for a specific voice (e.g., en_US-lessac-medium.onnx and en_US-lessac-medium.onnx.json).
2. The Conversion Command
To convert a text file (let's call it input.txt) into an audio file (output.wav), use the following syntax:
Bash
piper --model /path/to/voice.onnx < input.txt --output_file output.wav
3. Practical Example
If your text file is named script.txt and your model is in the same folder, run:
Bash
cat script.txt | piper --model en_US-lessac-medium.onnx --output_file speech.wav
Pro Tips for Better Usage
Adjusting Speed: Use the
--length_scaleflag. A higher number makes it slower, a lower number makes it faster.Example (Slower):
--length_scale 1.5
Adding Pause/Sentence Gap: Use the
--sentence_silenceflag to add seconds of silence between sentences.Example:
--sentence_silence 0.5
Batch Processing: If you want to listen to the file immediately without saving it, you can pipe it to a player like
aplay(built-in to Ubuntu):Bashcat script.txt | piper --model en_US-lessac-medium.onnx --output-raw | aplay -r 22050 -f S16_LE -t raw
Quick Note: If you get a "command not found" error, your pip script folder might not be in your PATH. You can usually fix this by running python3 -m piper instead of just piper at the start of the command.
Do you have a specific voice or language in mind, or are you looking for recommendations on the best-sounding models?
Sorry, I open the page, but can not find en_US-lessac-medium.onnx and en_US-lessac-medium.onnx.json
# Download the .onnx model file
wget -O en_US-lessac-medium.onnx "https://huggingface.co/rhasspy/piper-voices/resolve/main/en/en_US/lessac/medium/en_US-lessac-medium.onnx?download=true"
# Download the .json config file
wget -O en_US-lessac-medium.onnx.json "https://huggingface.co/rhasspy/piper-voices/resolve/main/en/en_US/lessac/medium/en_US-lessac-medium.onnx.json?download=true"
# Download the .onnx model file (approx. 114MB)
wget -O en_GB-cori-high.onnx "https://huggingface.co/rhasspy/piper-voices/resolve/main/en/en_GB/cori/high/en_GB-cori-high.onnx?download=true"
# Download the .json config file
wget -O en_GB-cori-high.onnx.json "https://huggingface.co/rhasspy/piper-voices/resolve/main/en/en_GB/cori/high/en_GB-cori-high.onnx.json?download=true"
Run the conversion
Once those are finished, use this command to convert your text file (e.g., input.txt) to a UK-voiced audio file:
Bash
cat input.txt | piper --model en_GB-cori-high.onnx --output_file uk_speech.wav
Other UK Options
Gemini, could you give me the commands for downloading some other GB voice models, please? Thank you!Here are the commands for some of the most popular British (UK) voice models available for Piper. Each model has a slightly different personality and quality level.
1. Alan (Male - Medium Quality)
This is a standard, clear male British voice.
Bash
# Model
wget -O en_GB-alan-medium.onnx "https://huggingface.co/rhasspy/piper-voices/resolve/main/en/en_GB/alan/medium/en_GB-alan-medium.onnx?download=true"

# Config
wget -O en_GB-alan-medium.onnx.json "https://huggingface.co/rhasspy/piper-voices/resolve/main/en/en_GB/alan/medium/en_GB-alan-medium.onnx.json?download=true"
2. Southern English Female (Female - Low Quality)
Despite being "low" quality, it is very fast and efficient, with a distinct southern accent.
Bash
# Model
wget -O en_GB-southern_english_female-low.onnx "https://huggingface.co/rhasspy/piper-voices/resolve/main/en/en_GB/southern_english_female/low/en_GB-southern_english_female-low.onnx?download=true"

# Config
wget -O en_GB-southern_english_female-low.onnx.json "https://huggingface.co/rhasspy/piper-voices/resolve/main/en/en_GB/southern_english_female/low/en_GB-southern_english_female-low.onnx.json?download=true"
3. VCTK (Multi-speaker - Medium Quality)
The VCTK model is unique because it contains dozens of different British speakers in one file. You can switch between them using the --speaker flag (e.g., --speaker 0, --speaker 1, etc.).
Bash
# Model
wget -O en_GB-vctk-medium.onnx "https://huggingface.co/rhasspy/piper-voices/resolve/main/en/en_GB/vctk/medium/en_GB-vctk-medium.onnx?download=true"

# Config
wget -O en_GB-vctk-medium.onnx.json "https://huggingface.co/rhasspy/piper-voices/resolve/main/en/en_GB/vctk/medium/en_GB-vctk-medium.onnx.json?download=true"
How to use them
Just swap the model name in your command. For example, to use the Alan voice:
Bash
cat temp03.txt | piper --model en_GB-alan-medium.onnx --output_file output_alan.wav
Pro Tip: Automating the check
Since you've had issues with corrupted downloads before, you can run this quick "check" after downloading to see if the file is valid:
Bash
# This will show the size; Alan should be ~15MB, VCTK ~45MB
ls -lh *.onnx
If you ever want to try a Northern English accent, there is also a northern_english_male model available—just let me know and I'll grab those links for you!
Yes, please. Thank you!
The Northern English voice is a great choice—it has a very distinct, warm character compared to the standard "Received Pronunciation" (London-style) voices.
Here are the commands for the Northern English Male model (Medium quality):
1. Download the Northern English Voice Files
Bash
# Download the .onnx model file (approx. 63MB)
wget -O en_GB-northern_english_male-medium.onnx "https://huggingface.co/rhasspy/piper-voices/resolve/main/en/en_GB/northern_english_male/medium/en_GB-northern_english_male-medium.onnx?download=true"

# Download the .json config file
wget -O en_GB-northern_english_male-medium.onnx.json "https://huggingface.co/rhasspy/piper-voices/resolve/main/en/en_GB/northern_english_male/medium/en_GB-northern_english_male-medium.onnx.json?download=true"
2. Run the conversion
Use this command to hear the new accent:
Bash
cat temp03.txt | piper --model en_GB-northern_english_male-medium.onnx --output_file northern_uk.wav
A Quick Tip for Your Setup
Since you've downloaded several voices now, your folder might be getting a bit crowded. You can verify all your available models at once with:
Bash
ls -lh *.onnx
Common Model Sizes for Comparison:
Cori (High): ~114 MB
Northern English (Medium): ~63 MB
Alan (Medium): ~15 MB
If any of these files show a size of only a few KB, they didn't download correctly—just delete that specific file and run the wget command for it again.
Enjoy the new voice! It’s one of the more unique ones in the British collection.
20 December 2025
Running Whisper AI for Real-Time Speech-to-Text on Linux
https://www.tecmint.com/whisper-ai-audio-transcription-on-linux/
1. Convert an Audio File into Text (not live, not automatically save it into a text file)
Whisper AI is an advanced automatic speech recognition (ASR) model developed by OpenAI that can transcribe audio into text with impressive accuracy and supports multiple languages. While Whisper AI is primarily designed for batch processing, it can be configured for real-time speech-to-text transcription on Linux.
In this guide, we will go through the step-by-step process of installing, configuring, and running Whisper AI for live transcription on a Linux system.
What is Whisper AI?
Whisper AI is an open-source speech recognition model trained on a vast dataset of audio recordings and it is based on a deep-learning architecture that enables it to:
- Transcribe speech in multiple languages.
- Handle accents and background noise efficiently.
- Perform translation of spoken language into English.
Since it is designed for high-accuracy transcription, it is widely used in:
- Live transcription services (e.g., for accessibility).
- Voice assistants and automation.
- Transcribing recorded audio files.
By default, Whisper AI is not optimized for real-time processing. However, with some additional tools, it can process live audio streams for immediate transcription.
Whisper AI System Requirements
Before running Whisper AI on Linux, ensure your system meets the following requirements:
Hardware Requirements:
- CPU: A multi-core processor (Intel/AMD).
- RAM: At least 8GB (16GB or more is recommended).
- GPU: NVIDIA GPU with CUDA (optional but speeds up processing significantly).
- Storage: Minimum 10GB of free disk space for models and dependencies.
Software Requirements:
- A Linux distribution such as Ubuntu, Debian, Arch, Fedora, etc.
- Python version 3.8 or later.
- Pip package manager for installing Python packages.
- FFmpeg for handling audio files and streams.
Step 1: Installing Required Dependencies
Before installing Whisper AI, update your package list and upgrade existing packages.
sudo apt update     [On Ubuntu]
sudo dnf update -y  [On Fedora]
sudo pacman -Syu    [On Arch]
Next, you need to install Python 3.8 or higher and Pip package manager as shown.
sudo apt install python3 python3-pip python3-venv -y             [On Ubuntu]
sudo dnf install python3 python3-pip python3-virtualenv -y       [On Fedora]
sudo pacman -S python python-pip python-virtualenv               [On Arch]
Lastly, you need to install FFmpeg, which is a multimedia framework used to process audio and video files.
sudo apt install ffmpeg     [On Ubuntu]
sudo dnf install ffmpeg     [On Fedora]
sudo pacman -S ffmpeg       [On Arch]
Step 2: Install Whisper AI in Linux
Once the required dependencies are installed, you can proceed to install Whisper AI in a virtual environment that allows you to install Python packages without affecting system packages.
python3 -m venv whisper_env
source whisper_env/bin/activate
pip install openai-whisper
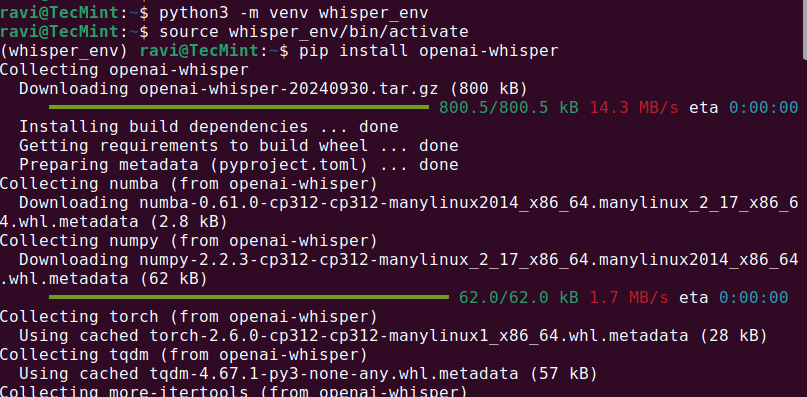

Once the installation is complete, check if Whisper AI was installed correctly by running.
whisper --help
This should display a help menu with available commands and options, which means Whisper AI is installed and ready to use.
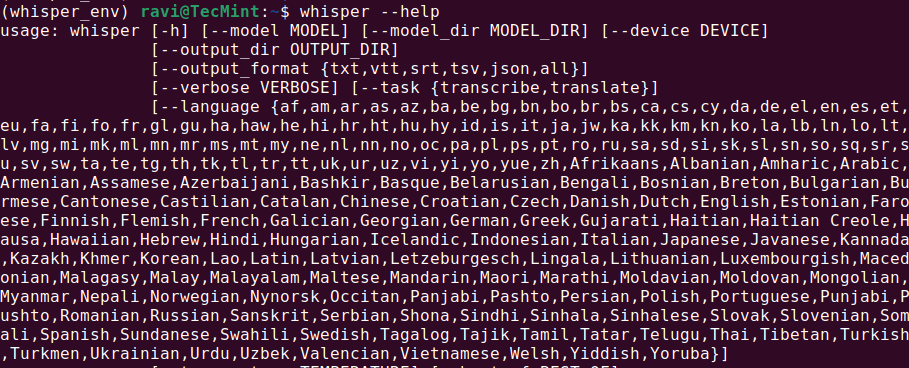
Step 3: Running Whisper AI in Linux
Once Whisper AI is installed, you can start transcribing audio files using different commands.
Transcribing an Audio File
To transcribe an audio file (audio.mp3), run:
whisper audio.mp3
Whisper will process the file and generate a transcript in text format.
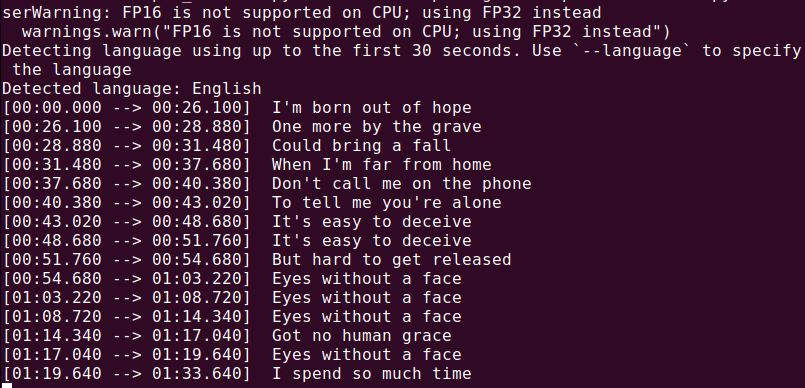
2. Convert Audio Files into Text Files in Batches (not live)
This is **batch (file-based)** transcription, not **live dictation**.
Auto-save text to Markdown / notes, please. Thank you!
------------------------------------------------------------------------------
You got it 👍
Below is a **NOT LIVE** but **clean, practical Whisper setup that automatically saves transcripts as well-formatted Markdown notes**. This works great for meetings, study notes, or voice journals.
I’ll give you:
1. 📁 Folder-based auto-transcription
2. 📝 Markdown formatting (title, timestamps, sections)
3. ⚙️ A reusable script you can customize
1️⃣ **Folder Structure (recommended)**
whisper_notes/
├── audio/ # put .wav / .mp3 here
├── notes/ # Markdown files auto-saved here
└── transcribe.py
Create it:
mkdir -p ~/whisper_notes/audio ~/whisper_notes/notes
cd ~/whisper_notes
2️⃣ **Install requirements (once)**
Auto-save text to Markdown / notes, please. Thank you!
------------------------------------------------------------------------------
You got it 👍
Below is a **NOT LIVE** but **clean, practical Whisper setup that automatically saves transcripts as well-formatted Markdown notes**. This works great for meetings, study notes, or voice journals.
I’ll give you:
1. 📁 Folder-based auto-transcription
2. 📝 Markdown formatting (title, timestamps, sections)
3. ⚙️ A reusable script you can customize
1️⃣ **Folder Structure (recommended)**
whisper_notes/
├── audio/ # put .wav / .mp3 here
├── notes/ # Markdown files auto-saved here
└── transcribe.py
Create it:
mkdir -p ~/whisper_notes/audio ~/whisper_notes/notes
cd ~/whisper_notes
2️⃣ **Install requirements (once)**
pip install openai-whisper torch
(You already installed Whisper, this just ensures dependencies.)
3️⃣ **Create the auto-Markdown script**
nano transcribe.py
Paste **this full script:**
import whisper
from pathlib import Path
from datetime import datetime
AUDIO_DIR = Path("audio")
NOTES_DIR = Path("notes")
MODEL_NAME = "medium" # change to small if CPU is slow
NOTES_DIR.mkdir(exist_ok=True)
model = whisper.load_model(MODEL_NAME)
def seconds_to_mmss(seconds):
m = int(seconds // 60)
s = int(seconds % 60)
return f"{m:02d}:{s:02d}"
for audio_file in AUDIO_DIR.iterdir():
if audio_file.suffix.lower() not in {".wav", ".mp3", ".m4a", ".flac"}:
continue
print(f"Transcribing: {audio_file.name}")
result = model.transcribe(audio_file, fp16=False)
title = audio_file.stem.replace("_", " ").title()
now = datetime.now().strftime("%Y-%m-%d %H:%M")
md_lines = [
f"# {title}",
"",
f"- **Date:** {now}",
f"- **Source:** `{audio_file.name}`",
"",
"## Transcript",
""
]
for seg in result["segments"]:
ts = seconds_to_mmss(seg["start"])
text = seg["text"].strip()
md_lines.append(f"- **[{ts}]** {text}")
md_file = NOTES_DIR / f"{audio_file.stem}.md"
md_file.write_text("\n".join(md_lines), encoding="utf-8")
print(f"Saved → {md_file}")
print("✅ All done.")
Save and exit.
4️⃣ **Use it (very simple)**
1️⃣ Put audio files into:
~/whisper_notes/audio/
2️⃣ Run:
python3 transcribe.py
3️⃣ Get Markdown notes in:
~/whisper_notes/notes/
5️⃣ Example Markdown Output
# Team Meeting Notes
- **Date:** 2025-01-21 14:30
- **Source:** `team_meeting.wav`
## Transcript
- **[00:00]** Good afternoon everyone, let's get started.
- **[00:32]** The first topic is system migration.
- **[02:15]** We expect completion by next Friday.
Perfect for:
- Obsidian
- VS Code
- GitHub
- Joplin
- Plain Markdown
6️⃣ **Optional Improvements (I can add these)**
✅ Auto-move processed audio
✅ One-file-per-day notes
✅ Headings instead of bullet timestamps
✅ Speaker labels (best-effort)
✅ Hotkey recording → auto-note
✅ Git auto-commit notes
✅ Summaries at top (AI-assisted)
Just tell me what you want next — this setup is a solid base 👌
I got the following error message -
'
Traceback (most recent call last):
File "/home/shermanchen/dev/whisperai/whisper_notes/transcribe.py", line 23, in <module>
result = model.transcribe(audio_file, fp16=False)
^^^^^^^^^^^^^^^^^^^^^^^^^^^^^^^^^^^^^^^^
File "/home/shermanchen/dev/whisperai/whisper_env/lib/python3.12/site-packages/whisper/transcribe.py", line 139, in transcribe
mel = log_mel_spectrogram(audio, model.dims.n_mels, padding=N_SAMPLES)
^^^^^^^^^^^^^^^^^^^^^^^^^^^^^^^^^^^^^^^^^^^^^^^^^^^^^^^^^^^^^^^^
File "/home/shermanchen/dev/whisperai/whisper_env/lib/python3.12/site-packages/whisper/audio.py", line 141, in log_mel_spectrogram
audio = torch.from_numpy(audio)
^^^^^^^^^^^^^^^^^^^^^^^
TypeError: expected np.ndarray (got PosixPath)
'
Great, thanks for pasting the full traceback — this is a **clear and easy fix** 👍
You’re actually **very close**.
✅ **What went wrong (exactly)**
This line caused it:
result = model.transcribe(audio_file, fp16=False)
`audio_file` is a Path object (`PosixPath`), but **Whisper expects either**:
- a string path (`str`)
- or a **NumPy array**
So Whisper tried to treat the `Path` like audio data → 💥 error.
✅ **The fix (one-line change)**
Convert the `Path` to a string.
**Edit your script:**
nano transcribe.py
**Change this line:**
result = model.transcribe(audio_file, fp16=False)
**To this:**
result = model.transcribe(str(audio_file), fp16=False)
Save and exit.
✅ **Run it again**
python3 transcribe.py
You should now see:
Transcribing: something.wav
Saved → notes/something.md
✅ All done.
🧠 **Why this happens (for future reference)**
- `pathlib.Path` is great for filesystem logic
- Whisper internally calls NumPy / Torch
- Those libraries **do not understand Path objects**
- Converting to `str()` is the correct and standard solution
This is a **very common Python + ML gotcha**, not your fault.
🔒 **Optional hardening (recommended)**
If you want to make the script more robust, you can add:
audio_path = audio_file.resolve()
result = model.transcribe(str(audio_path), fp16=False)
This avoids issues with symlinks or relative paths.
Next enhancements (I can implement any of these for you)
✔ Auto-move processed audio to audio/processed/
✔ Skip already-transcribed files
✔ Daily Markdown notes (append instead of overwrite)
✔ Add a summary section at the top
✔ Faster mode (--beam_size, --temperature)
✔ Hotkey recording → instant Markdown note
Just tell me what you want next — your setup is now solid ✅
3. Live Transcribe Voice from Microphone into a Text File
Below is a **working, practical solution** for **LIVE microphone → Whisper → auto-append to a Markdown note** on Ubuntu.
This is the **best compromise** Whisper can do (because Whisper is not truly streaming).
How “Live” Whisper Actually Works (important)
------------------------------------------------------------------------------
Whisper **cannot transcribe word-by-word** like Vosk.
The correct way is:
🎤 Record short chunks (e.g. 5–10 seconds) → transcribe → append to Markdown → repeat
This gives:
- ✅ High accuracy
- ✅ Punctuation
- ✅ Continuous notes
- ❌ A few seconds delay (unavoidable)
✅ **Final Result**
- You speak continuously
- Every 5 seconds, Whisper transcribes
- Text is auto-appended to ONE Markdown note
- Timestamps included
- Stop anytime with Ctrl+C
**STEP 1 — Install dependencies (once)**
pip install openai-whisper sounddevice numpy
sudo apt install ffmpeg -y
**STEP 2 — Create live Markdown dictation script**
nano whisper_live_md.py
Paste **this full script**:
import whisper
import sounddevice as sd
import numpy as np
from datetime import datetime
from pathlib import Path
import queue
import time
MODEL_NAME = "small" # change to "medium" for higher accuracy
CHUNK_SECONDS = 5 # length per transcription chunk
SAMPLE_RATE = 16000
NOTES_DIR = Path("notes")
NOTES_DIR.mkdir(exist_ok=True)
note_file = NOTES_DIR / f"live_note_{datetime.now().strftime('%Y-%m-%d_%H-%M')}.md"
model = whisper.load_model(MODEL_NAME)
audio_q = queue.Queue()
def callback(indata, frames, time_info, status):
audio_q.put(indata.copy())
def seconds_to_mmss(seconds):
m = int(seconds // 60)
s = int(seconds % 60)
return f"{m:02d}:{s:02d}"
with note_file.open("w", encoding="utf-8") as f:
f.write(f"# Live Dictation Notes\n\n")
f.write(f"- **Started:** {datetime.now().strftime('%Y-%m-%d %H:%M:%S')}\n\n")
print("🎤 Live dictation started (Ctrl+C to stop)")
try:
with sd.InputStream(samplerate=SAMPLE_RATE, channels=1, callback=callback):
while True:
audio_chunks = []
start_time = time.time()
while time.time() - start_time < CHUNK_SECONDS:
audio_chunks.append(audio_q.get())
audio = np.concatenate(audio_chunks, axis=0).flatten()
result = model.transcribe(audio, fp16=False)
text = result["text"].strip()
if text:
timestamp = datetime.now().strftime("%H:%M:%S")
line = f"- **[{timestamp}]** {text}\n"
with note_file.open("a", encoding="utf-8") as f:
f.write(line)
print(text)
except KeyboardInterrupt:
print("\n🛑 Dictation stopped.")
print(f"📝 Saved to: {note_file}")
Save and exit.
**STEP 3 — Run it**
python3 whisper_live_md.py
Start speaking 🎤
Every ~5 seconds:
- Text appears in terminal
- Text is appended to Markdown
**Example Markdown Output (LIVE)**
# Live Dictation Notes
- **Started:** 2025-01-21 22:10:03
- **[22:10:08]** Today I am testing live dictation using Whisper.
- **[22:10:14]** The accuracy is much better than Vosk.
- **[22:10:20]** This will be saved automatically as markdown.
Perfect for:
- Obsidian
- VS Code
- Joplin
- GitHub notes
**Recommended Settings (Important)**
**CPU only (most laptops)**
MODEL_NAME = "small"
CHUNK_SECONDS = 5
**Higher accuracy**
MODEL_NAME = "medium"
CHUNK_SECONDS = 8
**Faster response**
MODEL_NAME = "base"
CHUNK_SECONDS = 3
(The End)
This is the **best compromise** Whisper can do (because Whisper is not truly streaming).
How “Live” Whisper Actually Works (important)
------------------------------------------------------------------------------
Whisper **cannot transcribe word-by-word** like Vosk.
The correct way is:
🎤 Record short chunks (e.g. 5–10 seconds) → transcribe → append to Markdown → repeat
This gives:
- ✅ High accuracy
- ✅ Punctuation
- ✅ Continuous notes
- ❌ A few seconds delay (unavoidable)
✅ **Final Result**
- You speak continuously
- Every 5 seconds, Whisper transcribes
- Text is auto-appended to ONE Markdown note
- Timestamps included
- Stop anytime with Ctrl+C
**STEP 1 — Install dependencies (once)**
pip install openai-whisper sounddevice numpy
sudo apt install ffmpeg -y
**STEP 2 — Create live Markdown dictation script**
nano whisper_live_md.py
Paste **this full script**:
import whisper
import sounddevice as sd
import numpy as np
from datetime import datetime
from pathlib import Path
import queue
import time
MODEL_NAME = "small" # change to "medium" for higher accuracy
CHUNK_SECONDS = 5 # length per transcription chunk
SAMPLE_RATE = 16000
NOTES_DIR = Path("notes")
NOTES_DIR.mkdir(exist_ok=True)
note_file = NOTES_DIR / f"live_note_{datetime.now().strftime('%Y-%m-%d_%H-%M')}.md"
model = whisper.load_model(MODEL_NAME)
audio_q = queue.Queue()
def callback(indata, frames, time_info, status):
audio_q.put(indata.copy())
def seconds_to_mmss(seconds):
m = int(seconds // 60)
s = int(seconds % 60)
return f"{m:02d}:{s:02d}"
with note_file.open("w", encoding="utf-8") as f:
f.write(f"# Live Dictation Notes\n\n")
f.write(f"- **Started:** {datetime.now().strftime('%Y-%m-%d %H:%M:%S')}\n\n")
print("🎤 Live dictation started (Ctrl+C to stop)")
try:
with sd.InputStream(samplerate=SAMPLE_RATE, channels=1, callback=callback):
while True:
audio_chunks = []
start_time = time.time()
while time.time() - start_time < CHUNK_SECONDS:
audio_chunks.append(audio_q.get())
audio = np.concatenate(audio_chunks, axis=0).flatten()
result = model.transcribe(audio, fp16=False)
text = result["text"].strip()
if text:
timestamp = datetime.now().strftime("%H:%M:%S")
line = f"- **[{timestamp}]** {text}\n"
with note_file.open("a", encoding="utf-8") as f:
f.write(line)
print(text)
except KeyboardInterrupt:
print("\n🛑 Dictation stopped.")
print(f"📝 Saved to: {note_file}")
Save and exit.
**STEP 3 — Run it**
python3 whisper_live_md.py
Start speaking 🎤
Every ~5 seconds:
- Text appears in terminal
- Text is appended to Markdown
**Example Markdown Output (LIVE)**
# Live Dictation Notes
- **Started:** 2025-01-21 22:10:03
- **[22:10:08]** Today I am testing live dictation using Whisper.
- **[22:10:14]** The accuracy is much better than Vosk.
- **[22:10:20]** This will be saved automatically as markdown.
Perfect for:
- Obsidian
- VS Code
- Joplin
- GitHub notes
**Recommended Settings (Important)**
**CPU only (most laptops)**
MODEL_NAME = "small"
CHUNK_SECONDS = 5
**Higher accuracy**
MODEL_NAME = "medium"
CHUNK_SECONDS = 8
**Faster response**
MODEL_NAME = "base"
CHUNK_SECONDS = 3
(The End)
22 July 2023
Software for live vedio streaming, for different contents presentation - vmix
Software for live vedio streaming, for different contents presentation - vmix
23 June 2023
14 April 2020
Free audio recorder/editor, video live-streamer/recorder, video editor
Free audio recorder/editor - Audacity.
Free video live-streamer/recorder - OBS Studio.
Free video editor - OpenShot Video Editor; VideoPad; VSDC Video Software.
Free video live-streamer/recorder - OBS Studio.
Free video editor - OpenShot Video Editor; VideoPad; VSDC Video Software.
03 April 2013
07 June 2012
07 December 2010
How to extract audio from video?
Best method - Format Factory 格式工厂
Method 2 - The latest version of QQ Player has the function.
Method 3 - http://www.flv2mp3.com/
Method 2 - The latest version of QQ Player has the function.
Method 3 - http://www.flv2mp3.com/
Subscribe to:
Posts (Atom)