In the past, when someone forgot their password to a Windows machine, the only known remedy was to reinstall the operating system. This was as true for personal computers running Home versions of Windows as for Windows Server products like Server 2008. Today, that is no longer the case. There are several tools that will allow you to reset a Windows Server password, and most of them are relatively easy to use if you have some experience working with computers.
That being said, the case is different for novice users. Users who have never reset a password on a Windows machine before may find a couple of these methods to be a little tricky. Choose the one that you are most comfortable with, and follow the steps in the description.
- Method 1:Reinstalling Windows Server 2008
- Method 2: TunesBro WinGeeker
- Method 3: Offline NT Password & Registry Editor
Method 1: Reset Windows Server 2008 Password via Reinstall
Some administrators still prefer the old way of reinstalling the server OS if they forget the password. Maybe they have had bad experiences with password reset tools; maybe some of their data had been compromised; or maybe they are not comfortable using freeware applications, which can pose security and other risks. If you are one of the "old school" administrators and this is how you want to do it, then here's how to reinstall Windows Server 2008:Step 1. Before doing anything, please take a backup of all your local data. Since you are doing a full reinstallation of Windows Server, this is absolutely essential. Do not proceed without doing a backup.
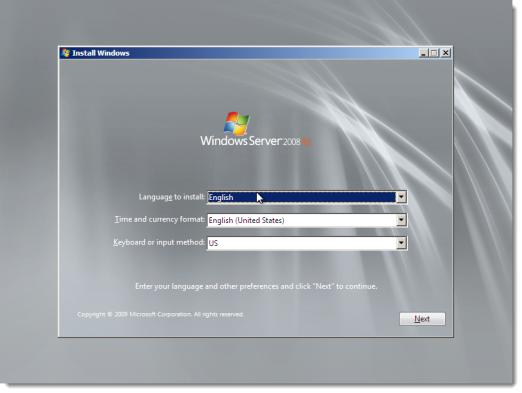
Step 2. Next, get your installation disk for Windows Server 2008 R2, insert it into your server PC and wait for the Install Windows screen to appear. Enter all the basic preferences such as language, time and currency format and keyboard input method and click on "Next". You will now see a button that says Install Now. Click on that.
Step 3 . The Installer window will ask you to select an operating system. Select the appropriate one and click on Next. Now accept the licence terms and click on "Next" again. The next option will be to choose the type of installation. The options are Upgrade and Custom. Unless you have purchased a licence for server 2012 or 2016, choose the Custom option.
Step 4 . Select the disk location details and click on Install Now, and the installation will begin. Your server will restart once the installation is complete. This particular method will prepare your computer for first use, which means the password must be changed before logging on for the first time. This is where you enter a new password, confirm it, and proceed to the next step.
Step 5 . You may now configure the server and activate the licence.
Note: You need to realise that since you are reinstalling the operating system, all the information in the local drives will be overwritten. That means you will need to take a backup of all your data prior to doing the reinstallation. This is also a labour-intensive task, so if you don't want to go through so much trouble, try the next method described below.
Method 2. Reset Windows Server 2008 Admin Password in One-Click
TunesBro WinGeeker Ultimate is a finely tuned piece of software that can reset various types of password on Windows machines. It has been extensively tested even before its first release, and testing has been done on over 1600 models of PCs, laptops and tablets.Because of the extensive testing and the continuous feature and capability additions to the software, it has an amazing recovery rate of 100% for Windows passwords. Using this utility will allow you to reset Windows Server password with absolutely no trouble and no disturbance to your data.
Main Features of WinGeeker Ultimate
- Easily reset Windows Server 2008 .
- Support local and admin password on Window Server.
- Add new user account and password for login.
- Create bootable password reset disk from USB or DVD.
Step 1 Install TunesBro WinGeeker
On a different Windows machine, download and install TunesBro WinGeeker Ultimate. Now insert a USB drive or a writable DVD / CD and launch the program.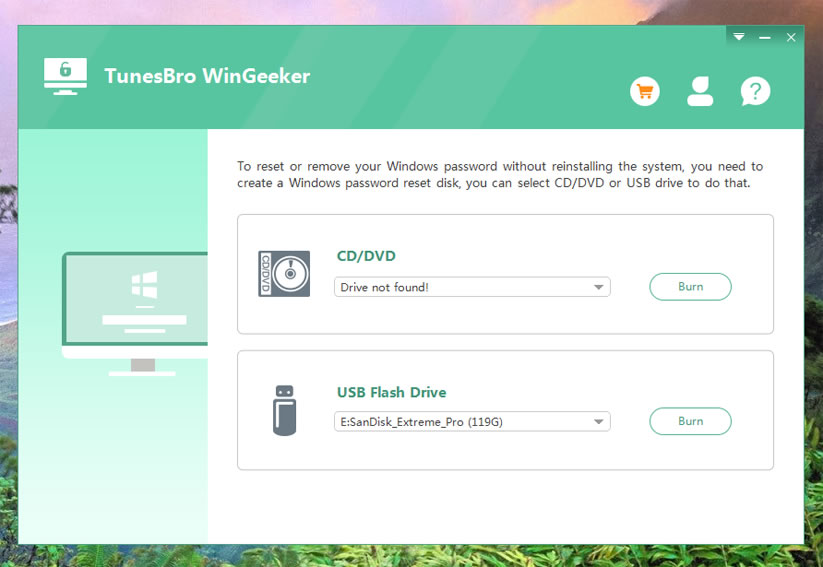
Step 2 Make Password Reset Disk
On the software interface you will see two burning options. Depending on what media you inserted, click on the 'Burn' option against that choice. Your bootable media will now be created in a few moments.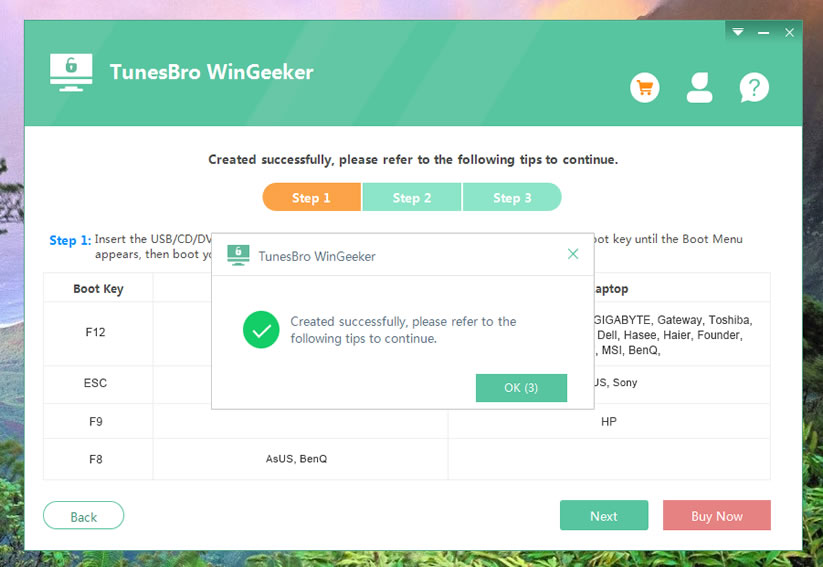
Step 3Change Boot Order on Windows Server 2008
Now take the DVD/CD or drive and insert it into the locked Windows Server. Boot up the machine and enter the boot menu to change the boot order. You can do this during the boot process by pressing F2 or another special key that will be shown on the screen.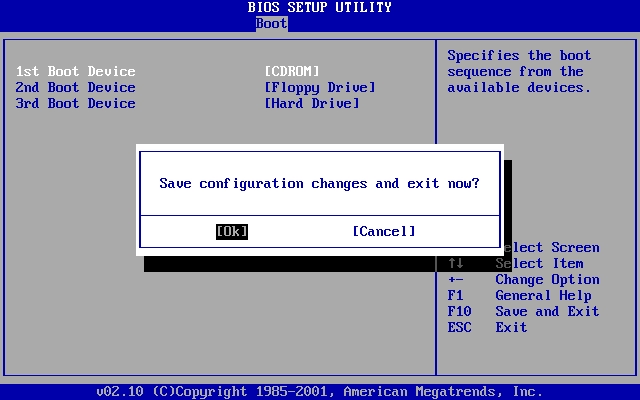
Step 4 Reset Administrator Password of Windows Server 2008 R2
Once you see the TunesBro WinGeeker interface, select the correct ISO file, which will be the Server 2008 R2 OS version. Then select the admin username and click on ‘Reset Password'. You can now click on the "Reboot" button, then remove the media from the server and restart the machine normally. You will be able to enter the admin account without requiring a password.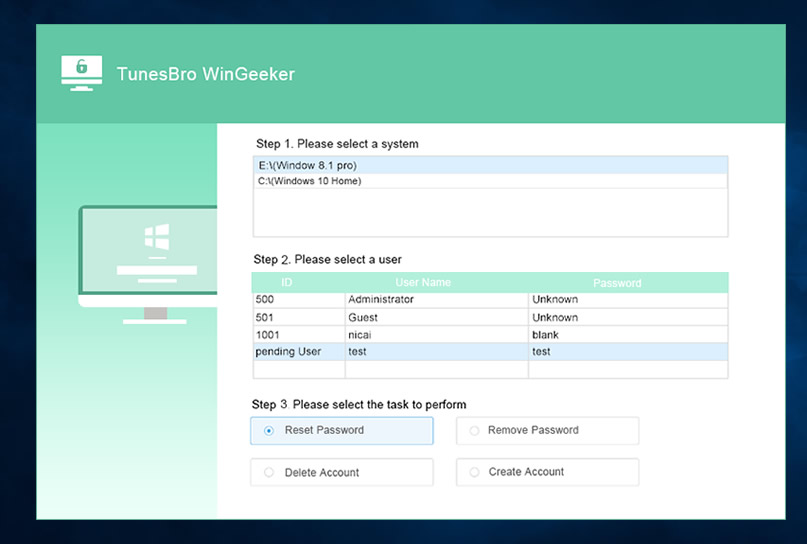
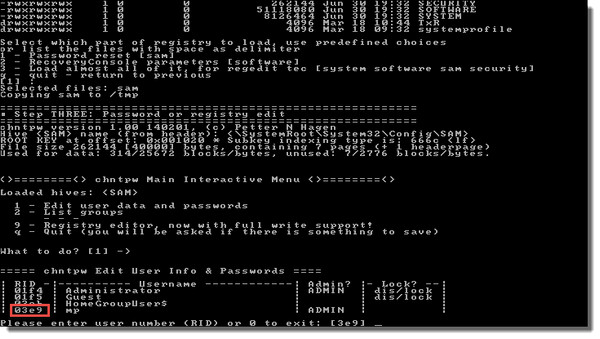
Method 3: Recover Server 2008 Password via Offline NT Password & Registry Editor
This popular utility is also known as NT password or, simply, chntpw utility. It's a fast way to reset Windows machine password, and there is no need to do a full backup before executing this particular process.The method requires a little bit of command line work, but most of it is restricted to leaving the default option as it is and simply hitting the Enter key multiple times. You must follow the process from start to finish as it is described below in order to reset your Windows Server password without disturbing any other system files.
Here is how to use NT password to reset your Windows Server 2008 R2 password. Obviously, since you don't have the password for your server machine, the first two steps will need to be executed on a different PC:
Step 1. First of all, you will need to download Offline NT Password & Registry Editor and extract the ISO file from the ZIP file that you downloaded. You will now need to create bootable media from this ISO file.
Step 2. The next step is to insert this bootable media into the server machine and boot up the system. You will now see the command line interface for NT Password after the initial boot process. Press Enter to select the default boot option and proceed.
Step 3 . From here on, you can simply type 1 and press Enter at every option. In the step that asks you to select the appropriate username, type in the username for the account which you need to clear the password for.
Step 4 . The last step is to exit the application and confirm writing the registry. You can do this by pressing '!' and Enter, then the letter 'q' and Enter again, and then 'y' and Enter when asked to confirm registry writing. You should see an 'EDIT COMPLETE' message on the screen if you have followed all the steps correctly.
Although steps are fairly straightforward, a lot of administrators are reluctant to use the software because it is open source. That means there has been no security updates for a long time, and using the software on a company server could compromise customer data or lead to other complications. If you are in this position, try the third method described below.