Showing posts with label Phone. Show all posts
Showing posts with label Phone. Show all posts
13 June 2024
28 July 2023
24 July 2017
How to set Email app on mobile phone to access exchange email system
How to set Email app on mobile phone to access exchange email system?
Incoming:
IMAP
webmail.xxxxxx.com
security type: none
port: 143
Outgoing:
smtp.bellnexxia.net
security type: none
port 25
require sign-in: no
Incoming:
IMAP
webmail.xxxxxx.com
security type: none
port: 143
Outgoing:
smtp.bellnexxia.net
security type: none
port 25
require sign-in: no
27 February 2017
How to turn your Windows 10 PC into a wireless hotspot
http://www.windowscentral.com/how-turn-your-windows-10-pc-wireless-hotspot
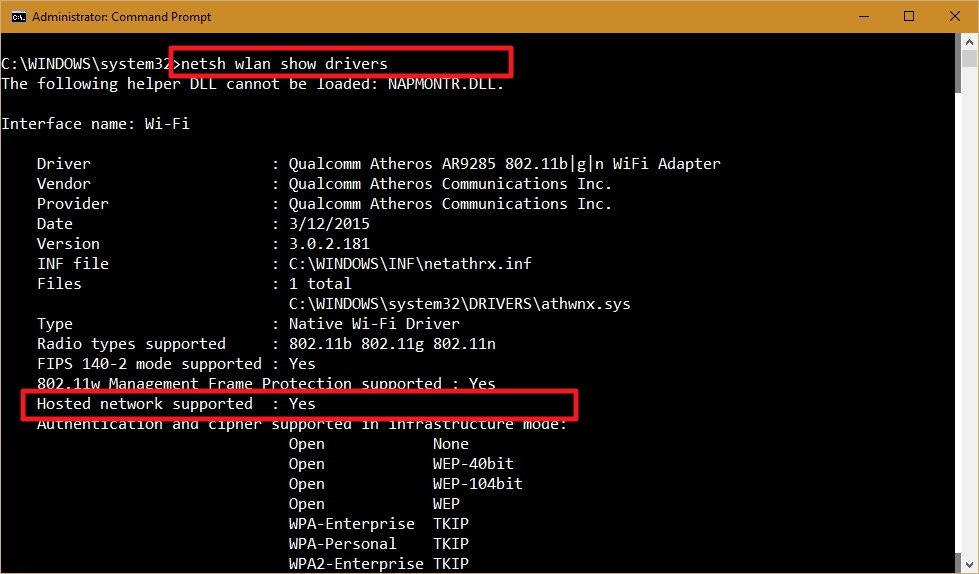


How to check if your wireless adapter supports Hosted Networks in Windows 10
While some adapters include support for Hosted Network, you will first need to verify your computer's physical wireless adapter supports this feature using the following command:
NETSH WLAN show drivers
If the generated output shows Hosted network supported: Yes, then you can continue with the guide. If your wireless adapter isn't supported, you could try using a USB wireless adapter that supports the feature.
How to create a wireless Hosted Network in Windows 10
Creating a wireless hotspot in Windows 10 is relatively straightforward — don't let the command line scare you. Simply follow the steps below to configure a wireless Hosted Network:
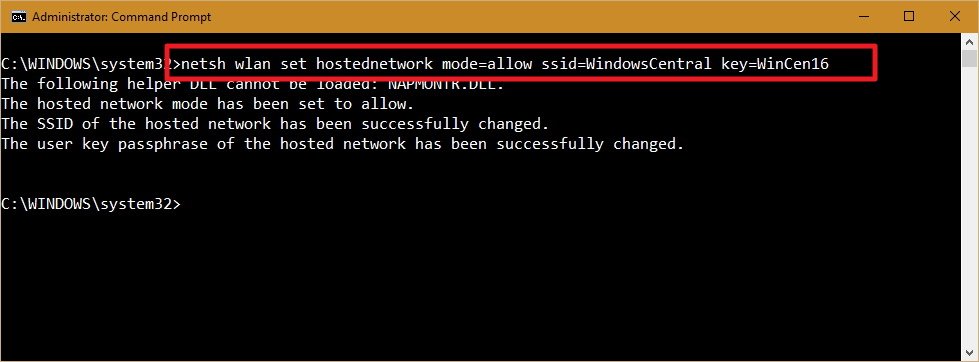
- While in Command Prompt (Admin) enter the following command:
NETSH WLAN set hostednetwork mode=allow ssid=Your_SSID key=Your_PassphraseWhere the SSID would be the name you want to identify your wireless network when trying to connect a new device, and the passphrase is the network security key you want users to use to connect to your network. (Remember that the passphrase has to be at least 8 characters in length.)
- Once you created a Hosted Network, enter the following command to activate it:
NETSH WLAN start hostednetwork
How to share your internet connection with a Hosted Network in Windows 10
Up to here, you created and started a Hosted Network in your Windows 10 PC. However, any wireless capable device won't be able to access the internet just yet. The last thing you need to do is to share an internet connection using the "Internet Connection Sharing" feature from a physical network adapter.
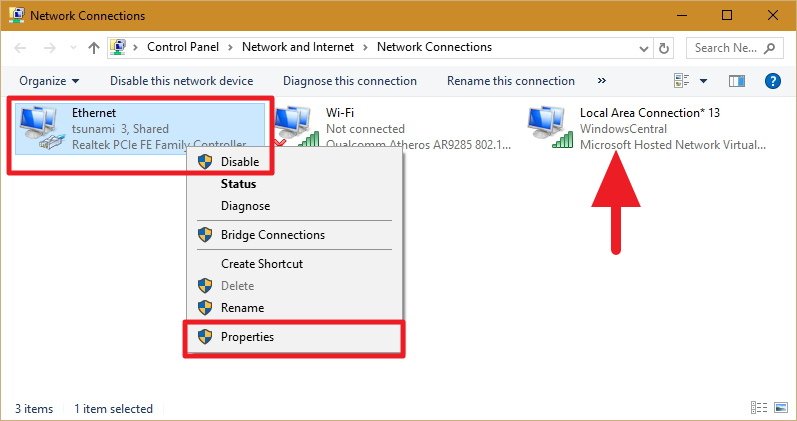
- Use the Windows key + X keyboard shortcut to open the Power User menu, and select Network Connections.
- Next, right-click the network adapter with an internet connection – this could be a traditional Ethernet or wireless network adapter — select Properties.
 Note: In Network Connections, you should now see a new our new Microsoft Hosted Virtual Adapter which is labeled Local Area Connection* X, and with the SSID name.
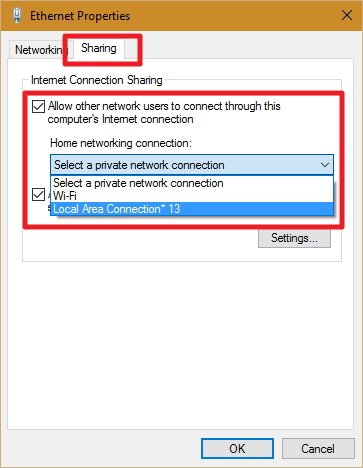
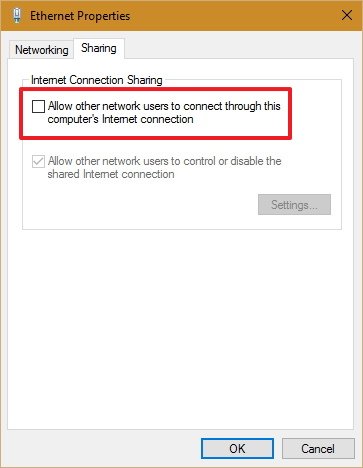
 - Click the Sharing tab.
- Check the Allow other network users to connect through this computer's Internet connection option.
- Next, from the Home networking connection drop-down menu select the Microsoft Hosted Virtual Adapter.

- Click OK to finish.
At this point, you should be able to see and connect any wireless capable device to the newly created software access point, and with access to the internet.
How to stop sharing an internet connection with other devices in Windows 10
If you want to temporary stop allowing other devices to connect wirelessly through your computer, you can type the following command in the Command Prompt and hit Enter:
NETSH WLAN stop hostednetwork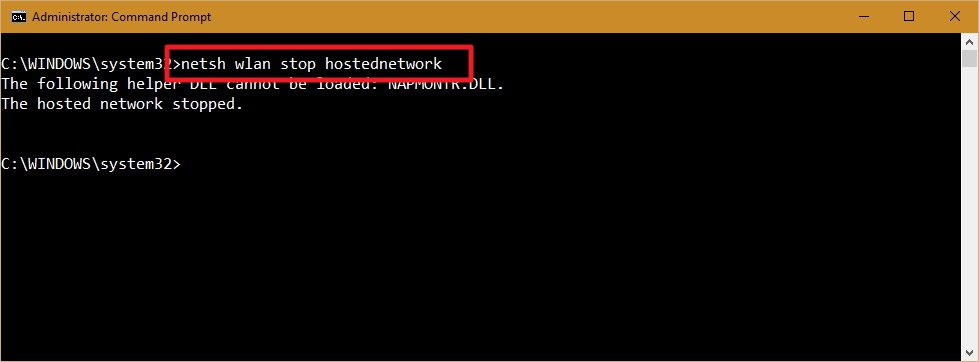
At any time, you can just use the start variant of the command to allow other devices to connect to the internet using your computer as an access point without extra configuration:
NETSH WLAN start hostednetwork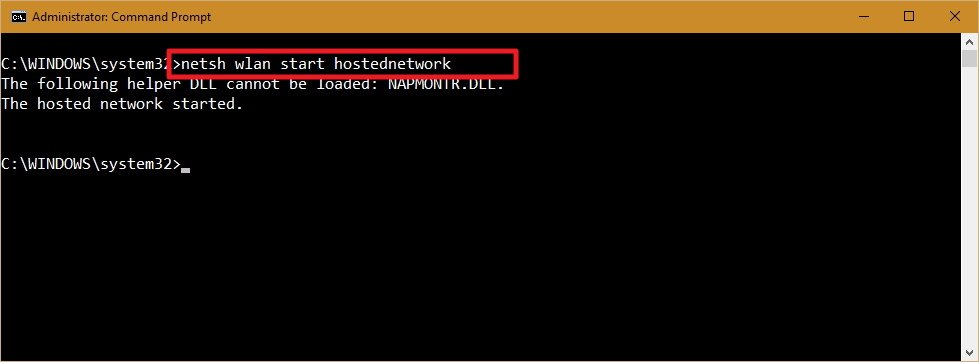
Similarly, you can also use the following command to enable or disable a wireless Hosted Network:
NETSH WLAN set hostednetwork mode=allowNETSH WLAN set hostednetwork mode= disallowHow to change a Hosted Network settings in Windows 10
In the case you want to change some of the current settings, such as SSID or network security you can use the following commands:
NETSH WLAN set hostednetwork ssid=Your_New_SSIDNETSH WLAN set hostednetwork key=Your_New_PassphraseHow to view the current Hosted Network settings
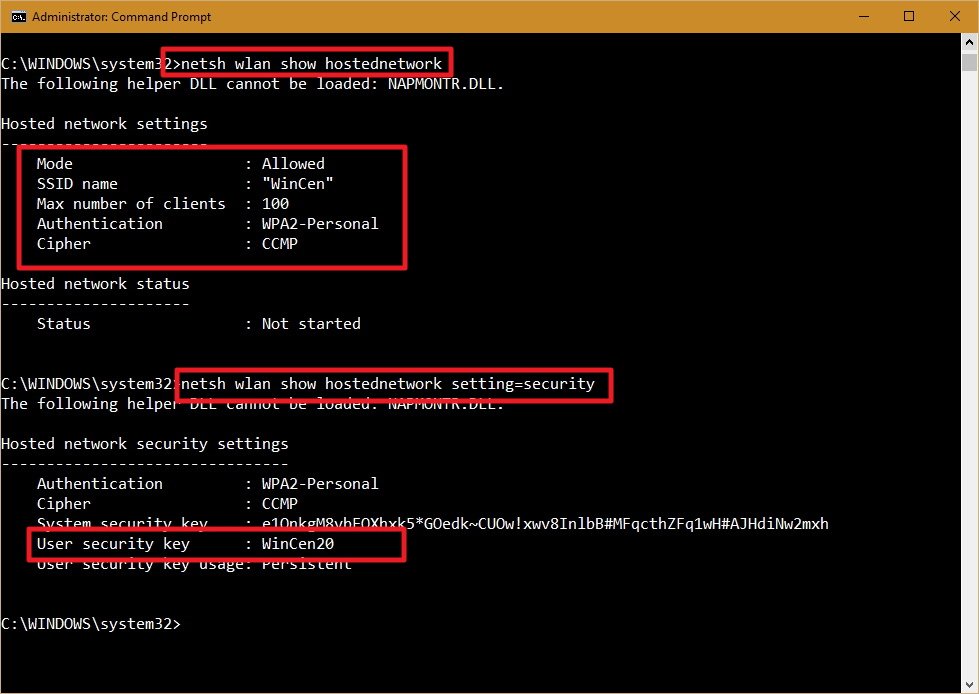
There are two commands to view the Hosted Network settings on your computer:
The following command shows the mode and SSID name in use, max number of clients that can connect, type of authentication, and cipher:
NETSH WLAN show hostednetwork
And the following command will also reveal the current network security key among other settings, similar to the previous command:
NETSH WLAN show hostednetwork setting=security
How to disable a wireless Hosted Network in Windows 10
While the setup of a wireless Hosted Network in Windows 10 is not very complicated, Microsoft doesn't make very straightforward to remove the configurations when you no longer need the feature.
Although you can use the stop or disallow commands, these actions won't eliminate the settings from your computer. If you want completely delete the Hosted Network settings in Windows 10, you'll need to modify the Registry.
Important: Before you change anything settings on your computer, it's worth noting that editing the Windows Registry can be a dangerous game that can cause irreversible damages to your system if you don't know what you are doing. As such, it's recommended for you to make a full backup of your system or at least System Restore Point before proceeding with this guide. You have been warned!
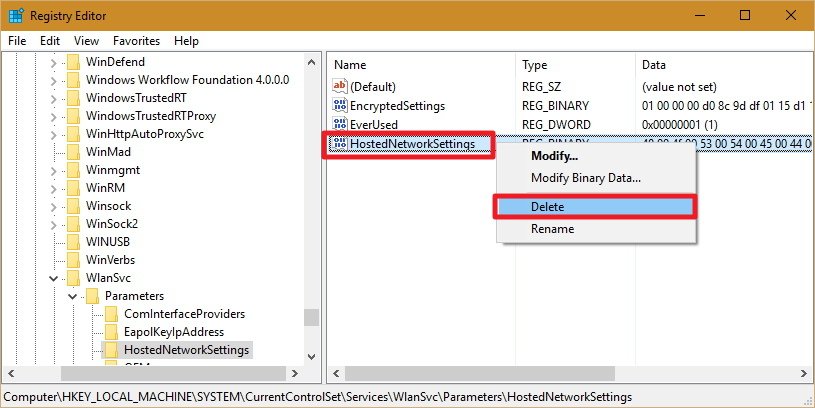
- Open the Start menu, do a search for regedit, hit Enter, and click OK to open the Registry with admin rights.
- Scroll down the following path in the Registry:HKEY_LOCAL_MACHINE\system\currentcontrolset\services\wlansvc\parameters\hostednetworksettingsRight-click the HostedNetworkSettings DWORD key, select Delete, and click Yes to confirm deletion.

- Restart your computer
- Open to the Command Prompt and use the following command:
NETSH WLAN show hostednetworkYou will know that you have successfully deleted the settings when the Settings field reads Not configured.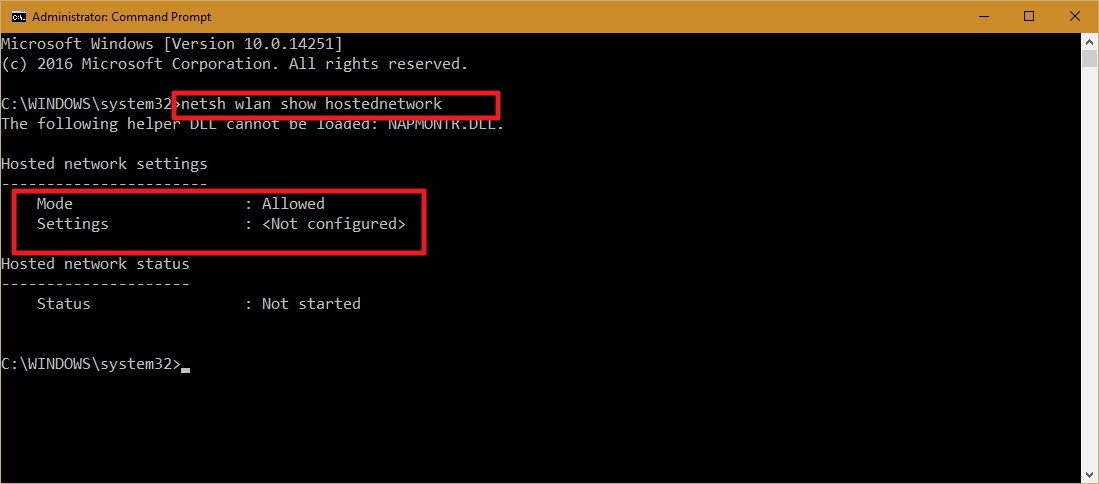
- Make sure you turn off "Internet Connection Sharing" in the physical network adapter that was sharing the internet with other devices. Use the Windows key + X keyboard shortcut to open the Power User menu, and select Network Connections.
- Right-click the network adapter, and select Properties.
- Click the Sharing tab.
- Uncheck the Allow other network users to connect through this computer's Internet connection option.
- Click OK to complete the process.


Things you need to know
Although the wireless Hosted Network feature in Windows 10 allows you to implement an access point solution to share an internet connection with other devices, it's not meant to be a solution to replace a physical wireless access point.
Also, there are a few things you want to consider. For example, wireless speeds will dramatically be reduced compared to the rates provided from a physical access point. Perhaps it would not be a big deal for internet browsing, but downloading or transferring big files could be an issue for some users.
You also need to consider that your computer needs to be always turned on to act as a wireless access point. If the computer enters into sleep, hibernate, or restarts, your wireless hotspot will stop working, and you will need to start manually the feature using the
NETSH WLAN start hostednetwork command.
You cannot run a SorftAP and ad hoc at the same time on Windows. If you need to create a temporary network connection between two computers, setting up ad hoc will turn off SoftAP — you can run one or the other, not both at the same time.
Wrapping things up
Wireless Hosted Network is a nifty feature in Windows can be a great tool to have for when you need to create a wireless access point on the go. It won't match the performance of a physical wireless access point, but it can be useful for many unexpected scenarios — like having one wired ethernet connection and several devices you want to get online. It's not a replacement for the real thing, but in a sticky situation, it can be just the fix you need.
31 May 2016
Enable Call Forward to CO? Panasonic KX-TDA200
Enable Call Forward to CO?
Setup -
In PBX, edit a new COS #, in which you enable 'Forward to CO'.
Edit your extension number, change your COS # into the new COS #.
To activate Forward -
*7102 9 (des. no.) #
To cancel Forward -
*7100
To enable busy forward to voice message box -
*7105 (voice message no.) #
(End)
Setup -
In PBX, edit a new COS #, in which you enable 'Forward to CO'.
Edit your extension number, change your COS # into the new COS #.
To activate Forward -
*7102 9 (des. no.) #
To cancel Forward -
*7100
To enable busy forward to voice message box -
*7105 (voice message no.) #
(End)
13 April 2016
How to project Android phone screen to your computer or projector
How to project Android phone screen to your computer or projector?
https://confluence.dimagi.com/display/commcarepublic/Android+Phone+Screen+Projection+to+your+computer
https://confluence.dimagi.com/display/commcarepublic/Android+Phone+Screen+Projection+to+your+computer
17 February 2016
MP4 Video which can be played universally - on Apple, Android, Computers
H.264 video (up to 720p, 30 frames per second; main profile level 3.1
with AAC-LC audio up to 160 Kbps, 48kHz, stereo audio in .m4v, .mp4, and
.mov file formats)
11 February 2016
MP4 Videos not Playing on Mobile Phones
Supporting Mobile Video on Your Site
https://www.jwplayer.com/blog/supporting-mobile-video-on-your-site/
Update: JW7 is now available. Check it out here.
One of the most often asked questions when discussing transcoding is How do I support iPads, iPhones and Android devices?. The goal of this blogpost is to remove some of the mystery behind transcoding for devices and present a solution that will work across a wide range of them.
 Error playing video on an iPhone
The underlying issue is processing power. Today’s desktop computers and laptops are powerful enough to decode just about any video format and size. Sometimes they can do it in hardware, meaning the graphics card (GPU) decodes the video. If a format is not supported by the hardware, desktops can fallback to software decoding. At that point, the player software itself will decode the video frames. Software decoding is slower than hardware decoding, but either option works.
Phones, netbooks and tablets on the other hand are not that powerful yet. Most are only able to do hardware decoding of video. It means the range of supported formats is narrowed down to what the GPU chip supports. Additionally, devices generally have an upper limit on the frame size of the video. For example, while the iPhone 4 supports HD video (1280×720 pixels), older models only supported video up to about 640×360 pixels.
 Some devices that can play our videos (excluding the pencil)
A video encoded for these devices will also work on desktops/notebooks (Flash), on many other phones (e.g. Blackberries, Nokias, Windows Phones) and on settops like PS3, XboX, Roku, Boxee and AppleTV. The specifications of such a video are as follows:
For embedding the video, you should use a recent version (6+) of the JW Player. In version 6, we released a download mode fallback, which allows devices that don’t support Flash or HTML5 to still play the video with their built-in media player. Here’s how the embed code looks with the default setup (Flash » HTML5 » Download):
The end result can be seen below; a good quality video that plays back on any device with a single embed code:
https://www.jwplayer.com/blog/supporting-mobile-video-on-your-site/
Update: JW7 is now available. Check it out here.
One of the most often asked questions when discussing transcoding is How do I support iPads, iPhones and Android devices?. The goal of this blogpost is to remove some of the mystery behind transcoding for devices and present a solution that will work across a wide range of them.
The Problem
Many popular video formats, like FLV or WMV, will not play on devices like the iPhone. Even videos encoded in MP4 may not play back, resulting in the following screen:The underlying issue is processing power. Today’s desktop computers and laptops are powerful enough to decode just about any video format and size. Sometimes they can do it in hardware, meaning the graphics card (GPU) decodes the video. If a format is not supported by the hardware, desktops can fallback to software decoding. At that point, the player software itself will decode the video frames. Software decoding is slower than hardware decoding, but either option works.
Phones, netbooks and tablets on the other hand are not that powerful yet. Most are only able to do hardware decoding of video. It means the range of supported formats is narrowed down to what the GPU chip supports. Additionally, devices generally have an upper limit on the frame size of the video. For example, while the iPhone 4 supports HD video (1280×720 pixels), older models only supported video up to about 640×360 pixels.
The Solution
Unfortunately, you cannot support every device under the sun with a single file. It cannot be done. What you can do, however, is support a wide range of devices with a single file. We call this targeting the least common denominator. This is what we do within our own video platform. The files we render are targeted at the following devices:- All iPad, iPhone and iPod Touch models (iPhone 3G, iPad 1 and above)
- All Android 2/3/4 phones and tablets (testing HTC Legend, Samsung Galaxy 1, Google Nexus 1 and above)
A video encoded for these devices will also work on desktops/notebooks (Flash), on many other phones (e.g. Blackberries, Nokias, Windows Phones) and on settops like PS3, XboX, Roku, Boxee and AppleTV. The specifications of such a video are as follows:
- Container format: MP4, headers at the beginning of the file (for seeking)
- Video format: H.264, Main profile, 640×360 pixels, around 500/900 kbps (kilobits per second)
- Audio format: AAC, Low Complexity profile, 44.1 kHz stereo, 96 kbps
Recommended Implementation
If you don’t have a tool for encoding to MP4/H264/AAC, you should download Handbrake. It is free, works on cross-platforms and produces high-quality results. Handbrake has a built-in present called iPhone & iPod Touch, which has exactly the right settings. Note that Handbrake supports a constant quality feature, which offers smaller files than a target size or target bitrate.For embedding the video, you should use a recent version (6+) of the JW Player. In version 6, we released a download mode fallback, which allows devices that don’t support Flash or HTML5 to still play the video with their built-in media player. Here’s how the embed code looks with the default setup (Flash » HTML5 » Download):
jwplayer("container").setup({

file: "/static/video-360p.mp4",

height: 360,

width: 640

});
The end result can be seen below; a good quality video that plays back on any device with a single embed code:
Resulting videoplayer that works on all desktops & devices.
Note you can enhance this video even further by adding an HD quality
video version. JW Player will enable this on select devices. See the HD Video Everywhere post for more info.
Subscribe to:
Posts (Atom)