Showing posts with label files. Show all posts

14 April 2026

How can I find duplicated files within a directory, please?

Finding duplicate files on Linux is a common task, and since you are already comfortable with the terminal, there are a few ways to do this—ranging from a quick manual check to using specialized tools.

1. The Pro Way: Using fdupes or jdupes

This is the most efficient method. fdupes (or the faster, more modern version jdupes) scans directories for files with identical sizes and then compares their MD5 signatures to confirm they are exact duplicates.

Installation:

Bash
sudo apt update
sudo apt install jdupes

How to use it:

  • To find and list duplicates:

    jdupes /home/shermanchen/my_folder

  • To see the size of space wasted by duplicates:

    jdupes -S /home/shermanchen/my_folder

  • To delete duplicates automatically (keeping the first one found):

    jdupes -dN /home/shermanchen/my_folder


2. The Built-in Way (No installation required)

If you don't want to install new software, you can use a combination of standard Linux tools. This command creates an MD5 hash for every file, sorts them, and highlights the ones that appear more than once.

Bash
find . -type f -exec md5sum {} + | sort | uniq -w32 -dD

Breakdown of what this does:

  1. find . -type f: Finds all files in the current directory.

  2. -exec md5sum {} +: Calculates the unique "fingerprint" (MD5) for every file.

  3. sort: Groups identical fingerprints together.

  4. uniq -w32 -dD: Compares the first 32 characters (the hash) and prints only the lines that are duplicates.


3. Visual Way: Using fslint or Czar

If you prefer a GUI (Graphic User Interface) to safely look at the files before deleting them, you can use FSlint.

Bash
sudo apt install fslint

Once installed, search for "FSlint" in your Ubuntu dashboard. It has a dedicated "Duplicates" tab that lets you search and select files to delete with a checkbox.


A Warning for your Backup

Since you just ran an rsync backup, be very careful when running duplicate finders on your backup drive.

If you use a tool like jdupes with the -L (link) option, it can turn duplicates into hard links. This saves space by making two file names point to the same data on the disk, which is a great way to optimize a server without actually losing data.

Which directory are you planning to scan? If it's a massive media folder, I highly recommend jdupes for its speed.


30 January 2026

How to move all the files in a directory to another directory on Linux

Gemini, I used the command -

$ ls -alhSp | grep -v /

, and got a list of files in the current directory.

What command can I use to move the files in the above list to another directory, please?


That is a very specific (and clever) command! You're using ls to list all files, sorting them by size (-S), adding a trailing slash to directories (-p), and then using grep to filter out anything with a slash.

Essentially, you've isolated just the regular files in your current folder, ranked from largest to smallest.

To move that specific list to another directory, you have a few options depending on how "clean" you want the process to be.


Method 1: The "Xargs" Approach (Recommended)

This is the most efficient way to take the output of one command and pipe it into another. We use the -I flag to create a placeholder (often {}) for the filenames.

Bash
ls -alhSp | grep -v / | awk '{print $9}' | xargs -I {} mv {} /path/to/destination/
  • awk '{print $9}': This is necessary because your original command uses -l (long format). awk grabs just the filename (the 9th column) so mv doesn't try to move the file permissions or timestamps.

  • xargs -I {}: This tells the system: "Take each filename and put it where the {} is in the next command."

Method 2: The Simple "Wildcard" (If you don't need the sort order)

If your goal is simply to move all files but no folders and you don't actually care about the size sorting from your original command, a simple loop is often safer:

Bash
for file in *; do [ -f "$file" ] && mv "$file" /path/to/destination/; done

⚠️ A Note on File Names

If any of your files have spaces in their names, the ls | grep method can get messy. When dealing with complex file movements, using find is generally the "Gold Standard" because it handles hidden characters and spaces much better:

Bash
find . -maxdepth 1 -type f -exec mv {} /path/to/destination/ \;
  • -maxdepth 1: Prevents it from looking into subfolders.

  • -type f: Ensures only files are moved (ignoring directories).


Which one should you use?

If you want...Use...
To keep using your ls logicMethod 1 (with awk)
The safest/fastest wayThe find command
To avoid complex syntaxMethod 2 (The loop)

Would you like me to explain how to modify that command to only move files over a certain size?


Yes, please. Thank you.


Since you are already using ls -S (sort by size), we can refine your pipeline to filter for specific size thresholds.

To do this effectively, we’ll swap ls for the find command. While ls is great for looking at files, find is a powerhouse for filtering them by attributes like size, age, or type.


Using find for Specific Sizes

This is the most reliable method. You can specify "greater than" (+) or "less than" (-) a certain size.

To move files larger than 100MB:

Bash
find . -maxdepth 1 -type f -size +100M -exec mv {} /path/to/destination/ \;

To move files smaller than 50KB:

Bash
find . -maxdepth 1 -type f -size -50k -exec mv {} /path/to/destination/ \;

Breakdown of the logic:

  • .: Look in the current directory.

  • -maxdepth 1: Don't go digging into subfolders.

  • -type f: Only look for files (this replaces your grep -v / logic).

  • -size +100M: The filter. Use k for Kilobytes, M for Megabytes, or G for Gigabytes.

  • -exec mv {} ...: The "action" part that moves every file found.


The "Quick & Dirty" Way (Using your original command)

If you prefer to stick to your ls command and just want to "eyeball" it, you can use head to move only the top largest files.

To move the top 5 largest files:

Bash
ls -pS | grep -v / | head -n 5 | xargs -I {} mv {} /path/to/destination/

Note: This version removes the -alh flags. When piping to mv, we don't want the "human-readable" sizes or permissions (like 1.2G or -rw-r--r--) included in the text, otherwise mv will get confused and think those are the filenames!


Comparison of Size Units

When using the -size flag in find, keep these suffixes in mind:

SuffixMeaningExample
kKilobytes-size +50k (Over 50 KB)
MMegabytes-size +10M (Over 10 MB)
GGigabytes-size +1G (Over 1 GB)
cBytes-size +100c (Over 100 Bytes)

Would you like me to show you how to do a "dry run" first, so you can see exactly which files will be moved before actually moving them?

 Yes, please. Thank you.


Performing a dry run is a pro move. It allows you to verify your logic without actually changing any files—saving you from that "oh no" moment when you accidentally move the wrong thing.

The simplest way to do a dry run is to replace the mv command with echo. This will print the command to your terminal instead of executing it.


1. Dry Run with the find Command

This is the safest way to test your size filters.

Bash
find . -maxdepth 1 -type f -size +100M -exec echo "Moving:" {} \;
  • What happens: The terminal will list every file larger than 100MB preceded by the word "Moving:". It won't actually move anything.

2. Dry Run with your ls Pipeline

If you are using the pipe method with xargs, just put echo before mv.

Bash
ls -pS | grep -v / | head -n 5 | xargs -I {} echo mv {} /path/to/destination/
  • What happens: You will see a list of commands like mv file1.zip /dest/. If the paths look correct, you can just hit the "Up" arrow on your keyboard and remove the echo to run it for real.


Comparison of Workflows

StepActionCommand Key
1. IdentifyList and filterfind or ls | grep
2. VerifyThe Dry Runecho
3. ExecuteFinal Movemv

A Quick Pro-Tip: The "Verbose" Flag

If you want to see the files moving while they are actually being moved (a middle ground between a dry run and flying blind), use the -v flag with mv:

Bash
mv -v source_file destination/
# Output: 'source_file' -> 'destination/source_file'

Would you like to know how to undo a move if you realize you sent files to the wrong folder?

 Yes, please. Thank you.


Moving files is instantaneous on the same disk, so there isn't a "Ctrl+Z" or "Undo" button in the terminal. However, you can effectively "reverse" the move by flipping the logic of your command.

Here are the best ways to handle an accidental move:

1. The "Reverse Move" (The Manual Fix)

If you just moved a specific group of files into a folder, the quickest way back is to go into that folder and move them back to the parent directory (represented by ..).

Bash
cd /path/to/destination/
mv * ../
  • Warning: Only do this if the destination folder was empty before you moved your files into it. Otherwise, you'll end up moving the original contents of that folder back to your source directory too!


2. The "By Time" Undo (The Precision Fix)

If you moved files into a folder that already had other files in it, you can use find to identify only the files that arrived in the last few minutes.

To move files out that arrived in the last 5 minutes:

Bash
find /path/to/destination/ -maxdepth 1 -type f -cmin -5 -exec mv {} ./ \;
  • -cmin -5: Finds files whose status changed (moved) less than 5 minutes ago.

  • ./: Moves them back to your current working directory.


3. Preventing Accidents: The "Interactive" Flag

To prevent needing an "undo" in the future, you can use the -i (interactive) flag. This forces the terminal to ask for your permission before overwriting any files at the destination.

Bash
mv -i source_file destination/
# Terminal: overwrite destination/source_file? (y/n)

Best Practices Summary

SituationSafety Strategy
Before movingUse echo for a Dry Run.
During the moveUse mv -v (Verbose) to see what's happening.
Potential OverwritesUse mv -n (No-clobber) to prevent overwriting existing files.
The "Undo"Use find with -cmin to isolate recently moved files.

Would you like me to show you how to create an "alias" so you can run these complex size-filtering moves with a single short command in the future?



04 February 2023

How to rename multiple file names all at once?

https://ostechnix.com/how-to-rename-multiple-files-at-once-in-linux/


Method 4 - Rename multiple files at once using vimv

As the name says, Vimv is a command line utility to bulk rename files using Vim editor. You can, of course, change the editor by changing the value of $EDITOR environment variable.

To install Vimv, git clone the repository:

$ git clone https://github.com/thameera/vimv.git

Copy the vimv binary to your $PATH, for example /usr/local/bin/.

$ sudo cp vimv/vimv /usr/local/bin/

Finally, make it executable:

$ sudo chmod +x /usr/local/bin/vimv

Now go to the directory and run the following command to edit the filenames.

$ vimv

You will see the filenames in Vi editor. Press i to switch to interactive mode and edit the filenames as the way you edit text in Vi editor. Once done, press ESC key and type :wq to save and exit.

The files inside the directory should be renamed now.


Method 3 - Rename files using renameutils

The renameutils is a set of programs that is designed to batch renaming files and directories faster and easier.

Renameutils consists of the following five programs:

  1. qmv (quick move),
  2. qcp (quick copy),
  3. imv (interactive move),
  4. icp (interactive copy),
  5. deurlname (delete URL).

Install renameutils in Linux

Renameutils is available in the default repositories of most Linux distributions. To install it on Arch-based systems, enable the community repository and run:

$ sudo pacman -Syu renameutils

On Debian-based systems:

$ sudo apt install renameutils

Now, let us see some examples.

1. qmv

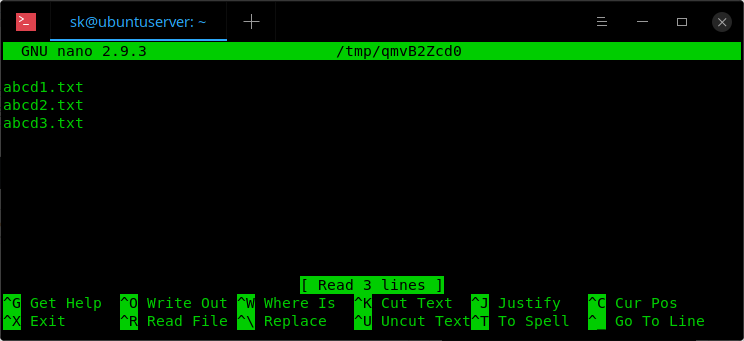
The qmv program will open the filenames in a directory in your default text editor and allows you to edit them.

I have the following three files in a directory named 'ostechnix'.

$ ls ostechnix/
abcd1.txt abcd2.txt abcd3.txt

To rename the filenames in the 'ostechnix' directory, simply do:

$ qmv ostechnix/

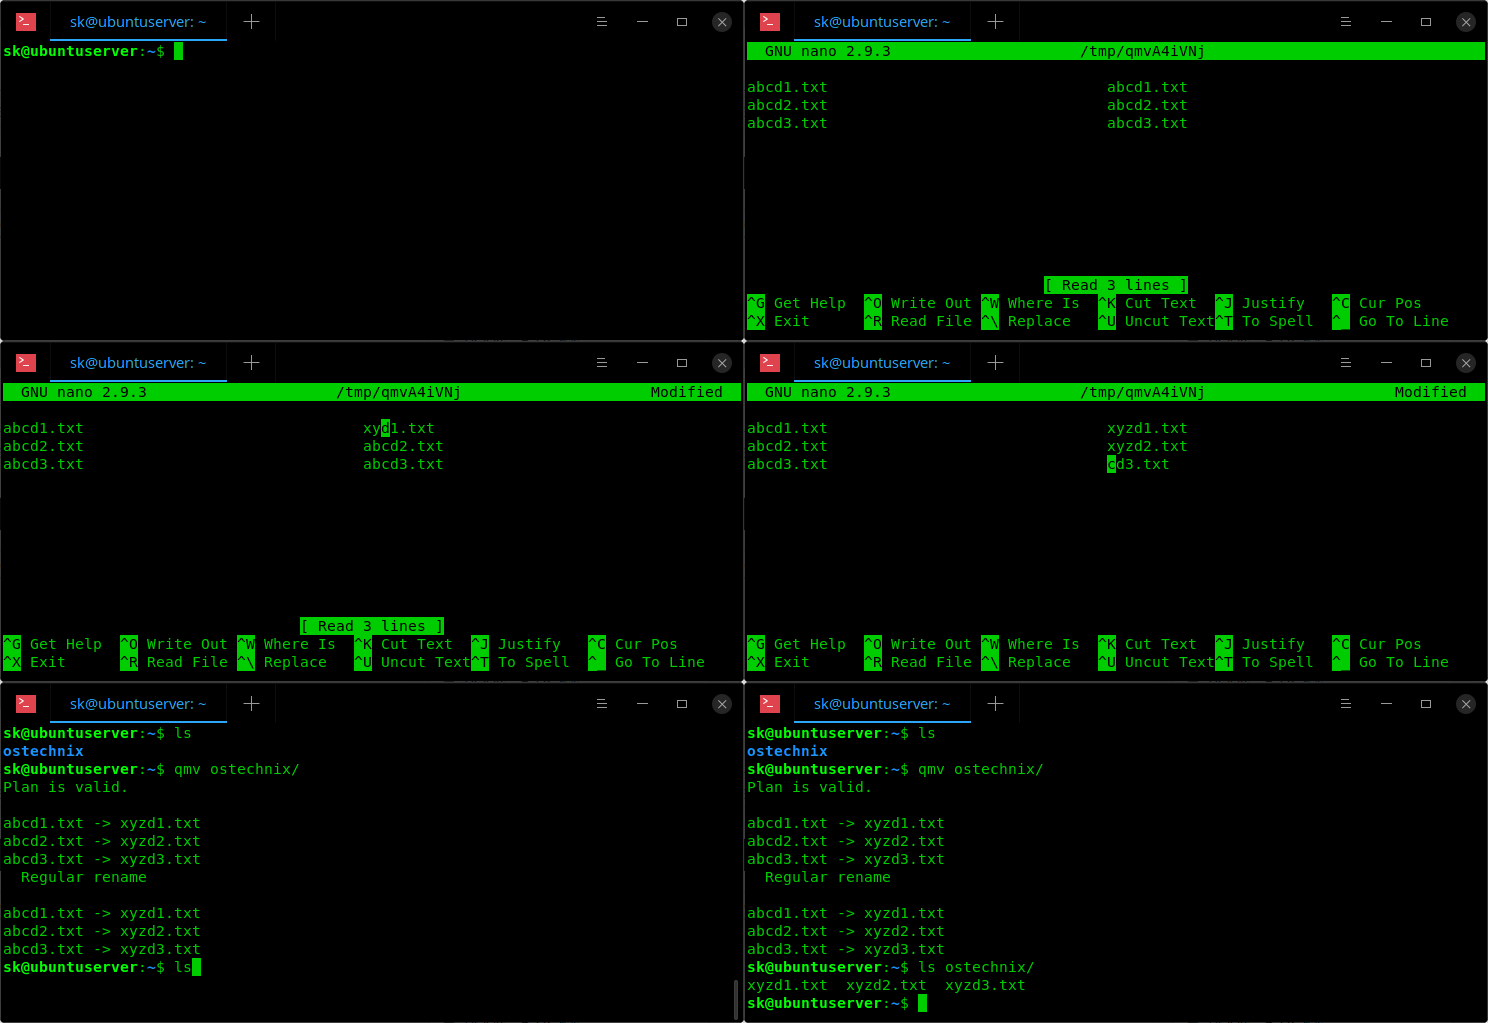
Now, change the filenames as you wish. You will see the live preview as you edit the filenames.

Alternatively, you can cd into the directory and simply run 'qmv'.

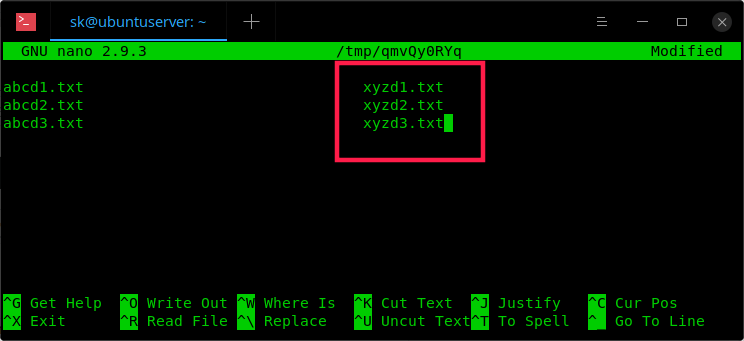
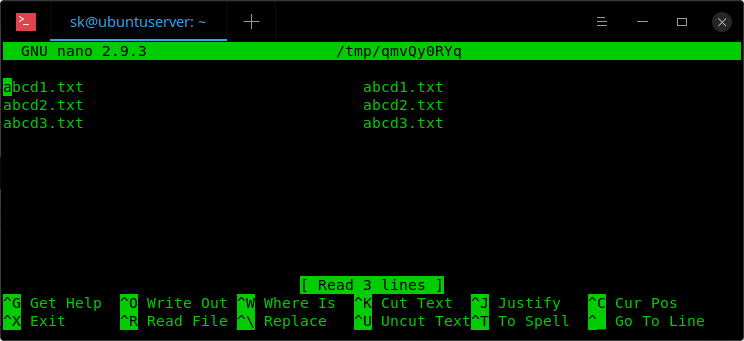
Once you opened the files, you will see the two columns as shown in the following screenshot.

Bulk rename files using qmv

The left column side displays the source filenames and the right column displays the destination names (the output filenames that you will get after editing).

Now, rename all the output names on the right side as you wish.

Bulk rename files using qmv

After renaming filenames, save and quit the file.

Finally, you will see the following output:

Plan is valid.

abcd1.txt -> xyzd1.txt
abcd2.txt -> xyzd2.txt
abcd3.txt -> xyzd3.txt
   Regular rename

abcd1.txt -> xyzd1.txt
abcd2.txt -> xyzd2.txt
abcd3.txt -> xyzd3.txt

Now, check if the changes have actually been made using 'ls' command:

$ ls ostechnix/
xyzd1.txt xyzd2.txt xyzd3.txt

See? All files are renamed. Not just files, the renameutils will also rename the directory names as well.

Here is a quick video demo of qmv program:

Bulk rename files using qmv

If you don't want to edit the filenames in dual-column format, use the following command to display the destination file column only.

$ qmv -f do ostechnix/

Where, '-f' refers the format and 'do' refers destination-only.

Now, you will see only the destination column. That's the column we make the changes.

Display the destination file column only in qmv

Once done, save and close the file.

For more details, refer man pages.

$ man qmv


01 July 2021

How to find all the files containing the string 'abc' in the current directory and all the sub-directories

How to find all the files containing the string 'abc' in the current directory and all the sub-directories?


find . -type f | xargs fgrep '...'

13 March 2019

How to Concatenate media files

 Concatenating media files


Using intermediate files

If you have MP4 files, these could be losslessly concatenated by first transcoding them to MPEG-2 transport streams. With H.264 video and AAC audio, the following can be used:

ffmpeg -i input1.mp4 -c copy -bsf:v h264_mp4toannexb -f mpegts intermediate1.ts
ffmpeg -i input2.mp4 -c copy -bsf:v h264_mp4toannexb -f mpegts intermediate2.ts
ffmpeg -i "concat:intermediate1.ts|intermediate2.ts" -c copy -bsf:a aac_adtstoasc output.mp4