Remove XP Antivirus 2012 (Uninstall Guide)
Posted by Grinler on December 5, 2011 @ 09:23 PM · Views: 67,695


What this infection does:
XP Antivirus 2012 is a variant of the 2012 name-changing rogue program that changes its name randomly depending on the version of Windows it is installed on. This guide will cover the variant of the 2012 name changing rogue called XP Antivirus 2012. This rogue is promoted in two ways. The first is through the use of fake online antivirus scanners that state that your computer is infected and then prompt you to download a file that will install the infection. The other method are hacked web sites that attempt to exploit vulnerabilities in programs that you are running on your computer to install the infection without your knowledge or permission.
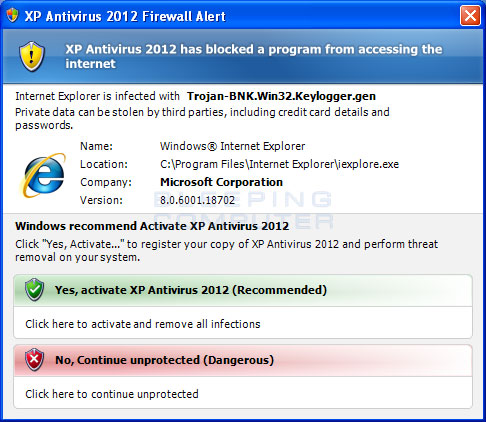
When installed, this rogue pretends to be a security update for Windows installed via Automatic Updates. It will then install itself as a single executable that has a random name consisting of three characters, such as nmi.exe, that uses very aggressive techniques to make it so that you cannot remove it. First, it makes it so that if you launch any executable it will instead start the XP Antivirus 2012 rogue and state that the executable you initially wanted to run is infected. It will also modify certain keys so that when you launch FireFox or Internet Explorer from the Window Start Menu it will launch the rogue instead and display a fake firewall warning stating that the program is infected.
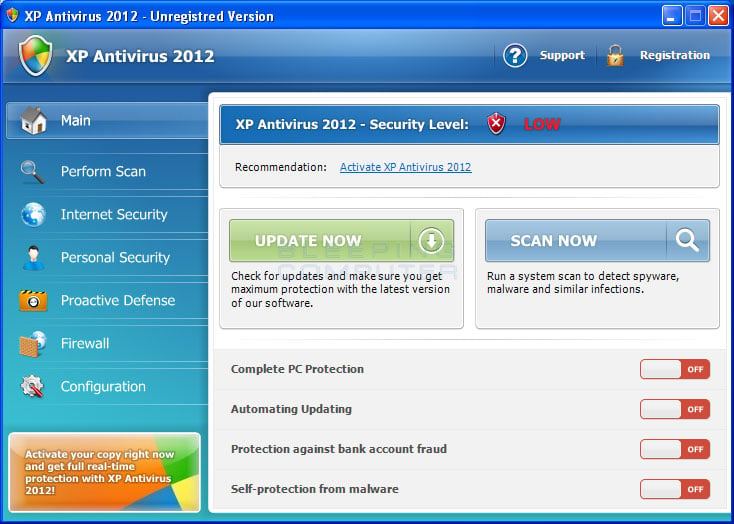
XP Antivirus 2012 screen shot
For more screen shots of this infection click on the image above.
There are a total of 4 images you can view.
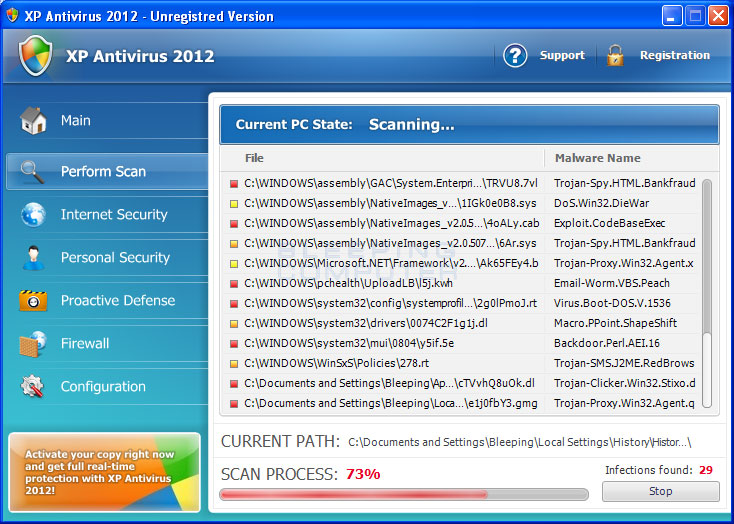
Once started, the rogue itself, like all other rogues, will scan your computer and state that there are numerous infections on it. If you attempt to use the program to remove any of these infections, though, it will state that you need to purchase the program first. In reality, though, the infections that the rogues states are on your computer are all legitimate files that if deleted could cause Windows to not operate correctly. Therefore, please do not manually delete any files based upon the results from this rogue's scan.
While running, XP Antivirus 2012 will also display fake security alerts on the infected computer. The text of some of these alerts are:
XP Antivirus 2012 Alert
System Integrity CheckWarning! Sensitive data may be sent over your internet connection right now!
Threat: Trojan-PSW.Win32.Antigen.A
XP Antivirus 2012 Alert
Critical System AlertUnknown software is trying to take control over your system!
Threat: Macro.Visio.Radiant
XP Antivirus 2012 Firewall Alert
XP Antivirus 2012 has blocked a program from accessing the internet
Internet Explorer is infected with Trojan-BNK.Win32.Keylogger.gen
Private data can be stolen by third parties, including credit card details and passwords.
Malware Intrusion
Sensitive areas of your system were found to be under attack. Spy software attack or virus infection possible. Prevent further damage or your private data will get stolen. Run an anti-spyware scan now. Click here to start.
System danger!Your system security is in danger. Privacy threats detected. Spyware, keyloggers or Trojans may be working the background right now. Perform an in-depth scan and removal now, click here.
System Hijack!System security threat was detected. Viruses and/or spyware may be damaging your system now. Prevent infection and data loss or stealing by running a free security scan.
Privacy threat!Spyware intrusion detected. Your system is infected. System integrity is at risk. Private data can be stolen by third parties, including credit card details and passwords. Click here to perform a security repair.
Stealth intrusion!Infection detected in the background. Your computer is now attacked by spyware and rogue software. Eliminate the infection safely, perform a security scan and deletion now.
XP Antivirus 2012 Alert
Security Hole Detected!
A program is trying to exploit Windows security holes! Passwords and sensitive data may be stolen. Do you want to block this attack?
Just like the scan results, these security warnings and alerts are all fake and should be ignored.
While running, XP Antivirus 2012 will also hijack Internet Explorer and Firefox so that you cannot visit certain sites. It does this so that you cannot receive help or information at sites like BleepingComputer.com on how to remove this infection. When you attempt to visit these sites you will instead be shown a fake alert stating that the site you are visiting is dangerous and that the rogue is blocking it for your protection. The message that you will see is:
XP Antivirus 2012 Alert
Internet Explorer alert. Visiting this site may pose a security threat to your system!
Possible reasons include:
- Dangerous code found in this site's pages which installed unwanted software into your system.
- Suspicious and potentially unsafe network activity detected.
- Spyware infections in your system
- Complaints from other users about this site.
- Port and system scans performed by the site being visited.
Things you can do:
- Get a copy of XP Antivirus 2012 to safeguard your PC while surfing the web (RECOMMENDED)
- Run a spyware, virus and malware scan
- Continue surfing without any security measures (DANGEROUS)
Just like the fake security alerts, the browser hijack is just another attempt to make you think that your computer has a security problem so that you will then purchase the program.
Without a doubt, this rogue is designed to scam you out of your money by hijacking your computer and trying to trick you into thinking you are infected. Therefore, please do not purchase this program , and if you have, please contact your credit card company and dispute the charges stating that the program is a computer infection. Finally, to remove XP Antivirus 2012 please use the guide below, which only contains programs that are free to use.
Threat Classification:
Advanced information:
View XP Antivirus 2012 files.
View XP Antivirus 2012 Registry Information.
Tools Needed for this fix:
Guide Updates:
12/05/11 - Initial guide creation.
- Print out these instructions as we will need to close every window that is open later in the fix.
- It is possible that the infection you are trying to remove will not allow you to download files on the infected computer. If this is the case, then you will need to download the files requested in this guide on another computer and then transfer them to the infected computer. You can transfer the files via a CD/DVD, external drive, or USB flash drive.
- This infection changes settings on your computer so that when you launch an executable, a file ending with .exe, it will instead launch the infection rather than the desired program. To fix this we must first download a Registry file that will fix these changes. From a clean computer, please download the following file and save it to a removable media such as a CD/DVD, external Drive, or USB flash drive.
FixNCR.reg (http://download.bleepingcomputer.com/reg/FixNCR.reg)
Once that file is downloaded and saved on a removable devices, insert the removable device into the infected computer and open the folder the drive letter associated with it. You should now see the FixNCR.reg file that you had downloaded onto it. Double-click on the FixNCR.reg file to fix the Registry on your infected computer. You should now be able to run your normal executable programs and can proceed to the next step.
If you do not have any removable media or another clean computer that you can download the FixNCR.reg file onto, you can try and download it to your infected computer using another method. On the infected computer, right click on the Internet Explorer's icon, or any other browser's icon, and select Run As or Run as Administrator. If you are using Windows XP, you will be prompted to select a user and enter its password. It is suggested that you attempt to login as the Administrator user. For Windows 7 or Windows Vista, you will be prompted to enter your Administrator account password.
Once you enter the password, your browser will start and you can download the above FixNCR.reg file. When saving it, make sure you save it to a folder that can be accessed by your normal account. Remember, that you will be launching the browser as another user, so if you save it to a My Documents folder, it will not be your normal My Documents folder that it is downloaded into. Instead it will be the My Documents folder that belongs to the user you ran the browser as. Once the download has finished, close your browser and find the FixNCR.reg file that you downloaded. Now double-click on it and allow the data to be merged. You should now be able to run your normal executable programs and can proceed to the next step. - Now we must first end the processes that belong to XP Antivirus 2012 and clean up some Registry settings so they do not interfere with the cleaning procedure. To do this, please download RKill to your desktop from the following link.
RKill Download Link - (Download page will open in a new tab or browser window.)
When at the download page, click on the Download Now button labeled iExplore.exe download link . When you are prompted where to save it, please save it on your desktop. - Once it is downloaded, double-click on the iExplore.exe icon in order to automatically attempt to stop any processes associated with XP Antivirus 2012 and other Rogue programs. Please be patient while the program looks for various malware programs and ends them. When it has finished, the black window will automatically close and you can continue with the next step. If you get a message that RKill is an infection, do not be concerned. This message is just a fake warning given by XP Antivirus 2012 when it terminates programs that may potentially remove it. If you run into these infections warnings that close RKill, a trick is to leave the warning on the screen and then run RKill again. By not closing the warning, this typically will allow you to bypass the malware trying to protect itself so that rkill can terminate XP Antivirus 2012 . So, please try running RKill until the malware is no longer running. You will then be able to proceed with the rest of the guide. If you continue having problems running RKill, you can download the other renamed versions of RKill from therkill download page. All of the files are renamed copies of RKill, which you can try instead. Please note that the download page will open in a new browser window or tab.
Do not reboot your computer after running RKill as the malware programs will start again. - There have been reports of this infection being bundled with the TDSS rootkit infection. To be safe you should also run a program that can be used to scan for this infection. Please follow the steps in the following guide:
How to remove Google Redirects or the TDSS, TDL3, or Alureon rootkit using TDSSKiller
If after running TDSSKiller, you are still unable to update Malwarebytes' Anti-malware or continue to have Google search result redirects, then you should post a virus removal request using the steps in the following topic rather than continuing with this guide:Preparation Guide For Use Before Using Malware Removal Tools and Requesting Help Topic
If TDSSKiller requires you to reboot, please allow it to do so. After you reboot, reboot back into Safe Mode with Networking again. - Download Malwarebytes' Anti-Malware, or MBAM, from the following location and save it to your desktop:
Malwarebytes' Anti-Malware Download Link (Download page will open in a new window) - Once downloaded, close all programs and Windows on your computer, including this one.
- Double-click on the icon on your desktop named mbam-setup.exe. This will start the installation of MBAM onto your computer.
- When the installation begins, keep following the prompts in order to continue with the installation process. Do not make any changes to default settings and when the program has finished installing, make sure you leave both the Update Malwarebytes' Anti-Malware and Launch Malwarebytes' Anti-Malware checked. Then click on the Finish button.
- MBAM will now automatically start and you will see a message stating that you should update the program before performing a scan. As MBAM will automatically update itself after the install, you can press the OK button to close that box and you will now be at the main program as shown below.
- On the Scanner tab, make sure the the Perform full scan option is selected and then click on the Scan button to start scanning your computer for XP Antivirus 2012 related files.
- MBAM will now start scanning your computer for malware. This process can take quite a while, so we suggest you go and do something else and periodically check on the status of the scan. When MBAM is scanning it will look like the image below.
- When the scan is finished a message box will appear as shown in the image below.You should click on the OK button to close the message box and continue with the XP Antivirus 2012 removal process.
- You will now be back at the main Scanner screen. At this point you should click on the Show Results button.
- A screen displaying all the malware that the program found will be shown as seen in the image below. Please note that the infections found may be different than what is shown in the image.
You should now click on the Remove Selected button to remove all the listed malware. MBAM will now delete all of the files and registry keys and add them to the programs quarantine. When removing the files, MBAM may require a reboot in order to remove some of them. If it displays a message stating that it needs to reboot, please allow it to do so. Once your computer has rebooted, and you are logged in, please continue with the rest of the steps. - When MBAM has finished removing the malware, it will open the scan log and display it in Notepad. Review the log as desired, and then close the Notepad window.
- You can now exit the MBAM program.
- As many rogues and other malware are installed through vulnerabilities found in out-dated and insecure programs, it is strongly suggested that you use Secunia PSI to scan for vulnerable programs on your computer. A tutorial on how to use Secunia PSI to scan for vulnerable programs can be found here:
How to detect vulnerable and out-dated programs using Secunia Personal Software Inspector


Your computer should now be free of the XP Antivirus 2012 program. If your current anti-virus solution let this infection through, you may want to considerpurchasing the PRO version of Malwarebytes' Anti-Malware to protect against these types of threats in the future.
If you are still having problems with your computer after completing these instructions, then please follow the steps outlined in the topic linked below:
Associated XP Antivirus 2012 Files:
%CommonAppData%\<random characters>
%LocalAppData%\<random characters>
%LocalAppData%\<random 3 chars>.exe
%Temp%\<random characters>
%UserProfile%\Templates\<random characters>File Location Notes:
%UserProfile% refers to the current user's profile folder. By default, this is C:\Documents and Settings\<Current User> for Windows 2000/XP, C:\Users\<Current User> for Windows Vista/7, and c:\winnt\profiles\<Current User> for Windows NT.
%Temp% refers to the Windows Temp folder. By default, this is C:\Windows\Temp for Windows 95/98/ME, C:\DOCUMENTS AND SETTINGS\<Current User>\LOCAL SETTINGS\Temp for Windows 2000/XP, and C:\Users\<Current User>\AppData\Local\Temp for Windows Vista and Windows 7.
%LocalAppData% refers to the current users Local settings Application Data folder. By default, this is C:\Documents and Settings\<Current User>\Local Settings\Application Data for Windows 2000/XP. For Windows Vista and Windows 7 it is C:\Users\<Current User>\AppData\Local.
%CommonAppData% refers to the Application Data folder in the All Users profile. For Windows XP, Vista, NT, 2000 and 2003 it refers to C:\Documents and Settings\All Users\Application Data\, and for Windows Vista/7 it is C:\ProgramData.
Associated XP Antivirus 2012 Windows Registry Information:
HKEY_CURRENT_USER\Software\Classes\.exe "(Default)" = 'ah'
HKEY_CURRENT_USER\Software\Classes\.exe\shell\open\command "(Default)" = "%LocalAppData%\<random 3 chars>.exe" -a "%1" %*
HKEY_CLASSES_ROOT\ah
HKEY_CURRENT_USER\Software\Classes\ah "(Default)" = 'Application'
HKEY_CURRENT_USER\Software\Classes\ah "Content Type" = 'application/x-msdownload'
HKEY_CURRENT_USER\Software\Classes\ah\DefaultIcon "(Default)" = '%1'
HKEY_CURRENT_USER\Software\Classes\ah\shell\open\command "(Default)" = "%LocalAppData%\<random 3 chars>.exe" -a "%1" %*
HKEY_CLASSES_ROOT\.exe\shell\open\command "(Default)" = "%LocalAppData%\<random 3 chars>.exe" -a "%1" %*
HKEY_CLASSES_ROOT\ah\shell\open\command "(Default)" = "%LocalAppData%\<random 3 chars>.exe" -a "%1" %*
HKEY_CLASSES_ROOT\ah\shell\open\command "IsolatedCommand"