06 December 2018

How to Add a Background Image to a Message in Outlook

How to Add a Background Image to a Message in Outlook

How to Add a Background Image to a Message in Outlook

  1. Position the cursor in the message body.
  2. Select Options > Page Color from the "Themes" section.
  3. Choose Fill Effects in the menu that appears.
  4. Go to the Picture tab of the Fill Effects window.
  5. Click Select Picture.
  6. Find the image you want to use as the background for the Outlook message. In some versions of Outlook, you can choose a picture from not only your computer but also a Bing search or your OneDrive account.
  7. Select the picture and then click Insert
  8. Press OK on the Fill Effects window.
To remove the image, just return to step 3 and choose No Color from the pop-out menu.


Older versions of Outlook require slightly different steps. If the above doesn't work for your edition of Outlook, try this:
  1. Click or tap somewhere in the body of the message.
  2. Select Format > Background > Picture from the menu.
  3. Use the file selection dialog box to pick an image from your computer.
  4. Click OK.
If you do not want the background image to scroll, you can prevent that, too.
You must reapply these settings for each email for which you want to have a background picture.
15 August 2018

Installing an SSL Certificate in Windows Server 2008 (IIS 7.0)


Windows Server 2008 includes Internet Information Services (IIS) 7.0. This new version makes several big changes in the way that SSL certificates are generated, making it much easier than previous versions of IIS. In addition to the new method of requesting and installing SSL certificates, IIS 7 includes the ability to:
  • Request more than one SSL certificate at a time
  • Import, export, and renew SSL certificates easily in IIS
  • Quickly create a self-signed certificate for testing
This article will walk you through the process of ordering an SSL certificate from a commercial certificate authority and installing it on an IIS 7 Windows Server 2008 machine. The process will also work for later versions such as Windows Server 2016 and IIS 8 and IIS 10 with some small modifications.

Create the Certificate Signing Request

The first step in ordering an SSL certificate is generating a Certificate Signing Request. This is very easy to do in IIS7 using the following instructions. Click here to hide or show the images
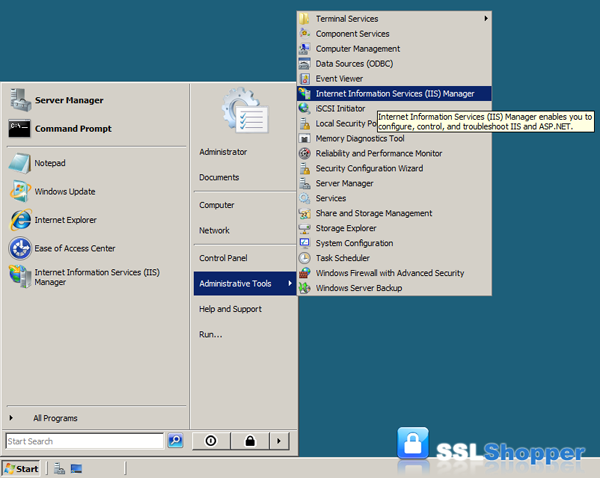
  1. Click on the Start menu, go to Administrative Tools, and click on Internet Information Services (IIS) Manager.
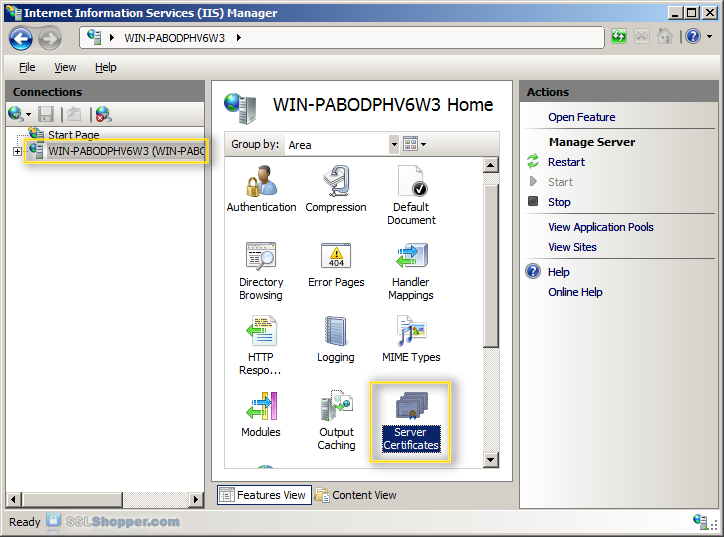
  2. Click on the name of the server in the Connections column on the left. Double-click on Server Certificates.
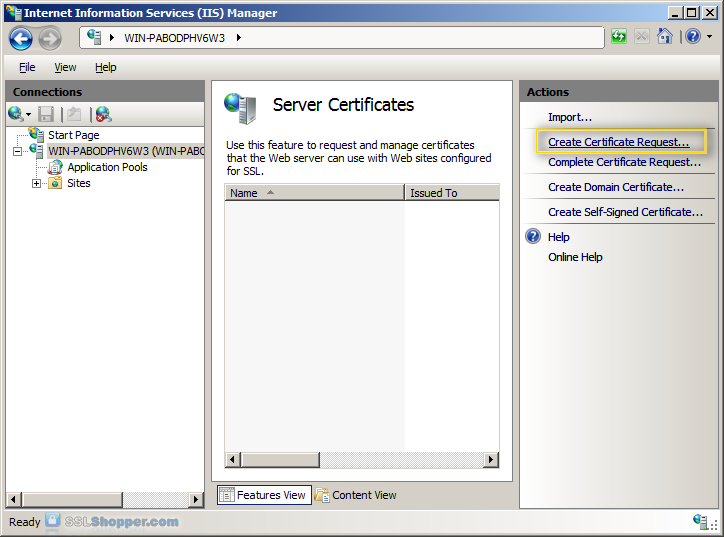
  3. In the Actions column on the right, click on Create Certificate Request...
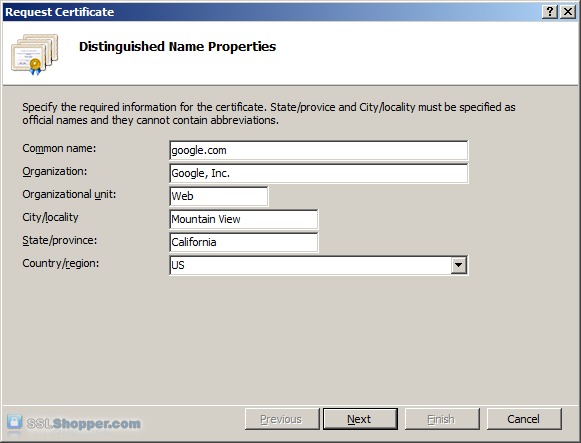
  4. Enter all of the following information about your company and the domain you are securing and then click Next.
    NameExplanationExamples
    Common NameThe fully qualified domain name (FQDN) of your server. This must match exactly what you type in your web browser or you will receive a name mismatch error.
    *.google.com
    mail.google.com
    OrganizationThe legal name of your organization. This should not be abbreviated and should include suffixes such as Inc, Corp, or LLC.Google Inc.
    Organizational UnitThe division of your organization handling the certificate. (Most CAs don't validate this field)IT
    Web
    City/LocalityThe city where your organization is located.Mountain View
    State/provinceThe state/region where your organization is located. This shouldn't be abbreviated.California
    Country/RegionThe two-letter ISO code for the country where your organization is location.US
    GB
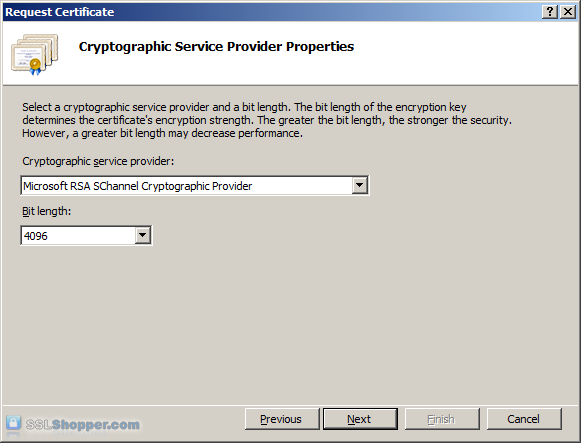
  5. Leave the default Cryptographic Service Provider. Increase the Bit length to 2048 bit or higher. Click Next.
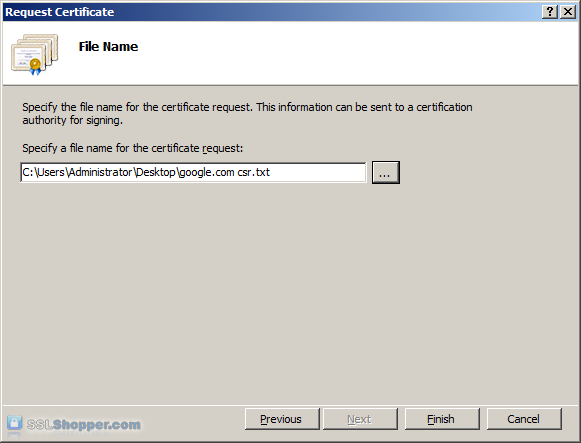
  6. Click the button with the three dots and enter a location and filename where you want to save the CSR file. Click Finish.
Once you have generated a CSR you can use it to order the certificate from a certificate authority. If you don't already have a favorite, you can compare SSL features from each provider using our SSL Wizard or by comparing cheap SSL certificatesWildcard Certificates, or EV certificates. Once you paste the contents of the CSR and complete the ordering process, your order is validated, and you will receive the SSL certificate file.

Install the Certificate

To install your newly acquired SSL certificate in IIS 7, first copy the file somewhere on the server and then follow these instructions:
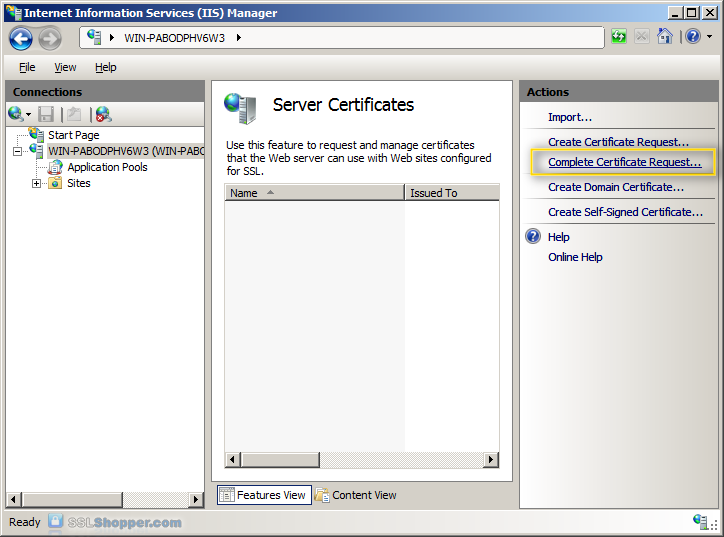
  1. Click on the Start menu, go to Administrative Tools, and click on Internet Information Services (IIS) Manager.
  2. Click on the name of the server in the Connections column on the left. Double-click on Server Certificates.
  3. In the Actions column on the right, click on Complete Certificate Request...
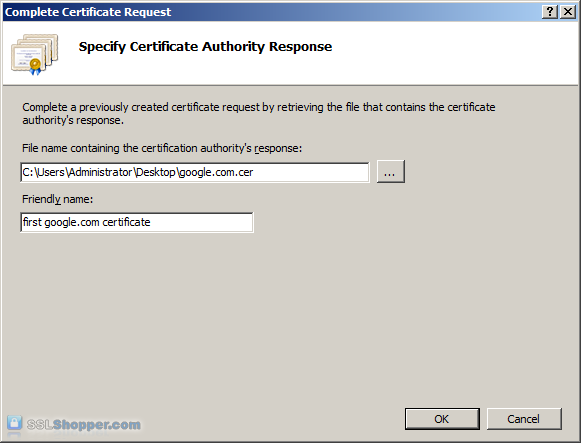
  4. Click the button with the three dots and select the server certificate that you received from the certificate authority. If the certificate doesn't have a .cer file extension, select to view all types. Enter any friendly name you want so you can keep track of the certificate on this server. Click OK.
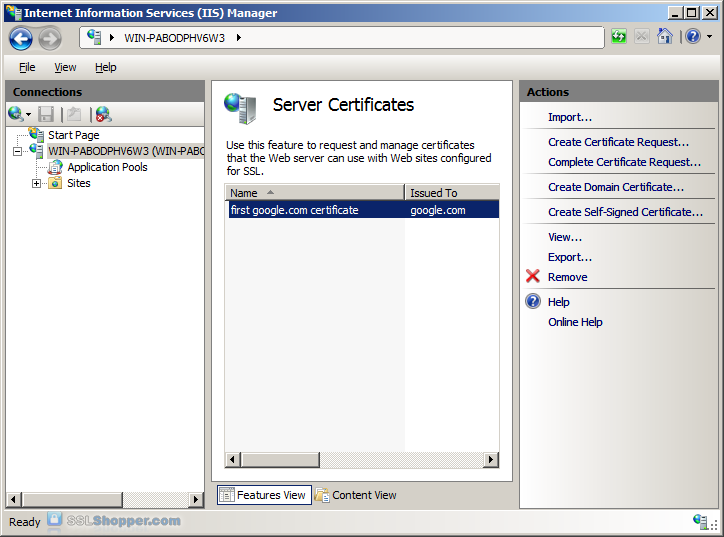
  5. If successful, you will see your newly installed certificate in the list. If you receive an error stating that the request or private key cannot be found, make sure you are using the correct certificate and that you are installing it to the same server that you generated the CSR on. If you are sure of those two things, you may just need to create a new Certificate Request and reissue/replace the certificate. Contact your certificate authority if you have problems with this.

Bind the Certificate to a website

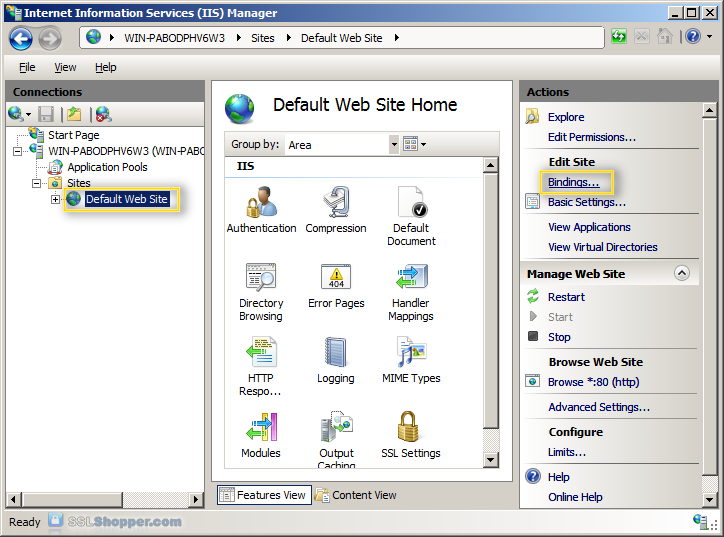
  1. In the Connections column on the left, expand the sites folder and click on the website that you want to bind the certificate to. Click on Bindings...in the right column.
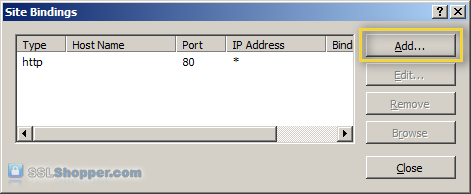
  2. Click on the Add...button.
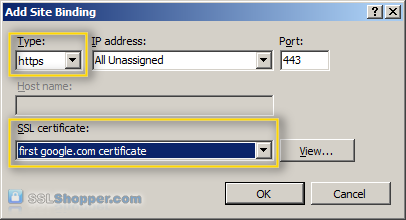
  3. Change the Type to https and then select the SSL certificate that you just installed. Click OK.
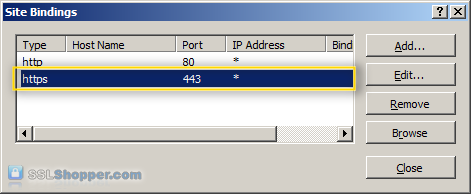
  4. You will now see the binding for port 443 listed. Click Close.

Install any Intermediate Certificates

Most SSL providers issue server certificates off of an Intermediate certificate so you will need to install this Intermediate certificate to the server as well or your visitors will receive a Certificate Not Trusted Error. You can install each Intermediate certificate (sometimes there is more than one) using these instructions:
  1. Download the intermediate certificate to a folder on the server.
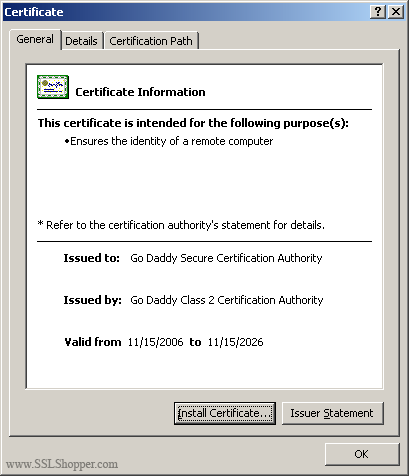
  2. Double click the certificate to open the certificate details.
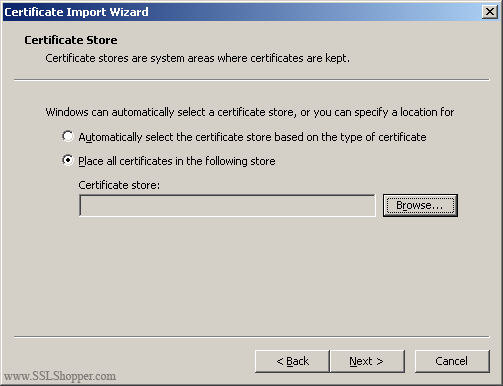
  3. At the bottom of the General tab, click the Install Certificate button to start the certificate import wizard. Click Next.
  4. Select Place all certificates in the following store and click Browse.
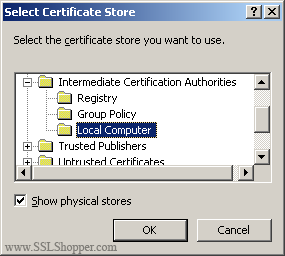
  5. Check the Show physical stores checkbox, then expand the Intermediate Certification Authorities folder, select the Local Computer folder beneath it. Click OK. Click Next, then Finishto finish installing the intermediate certificate.
You may need to restart IIS so that it starts giving out the new certificate. You can verify that the certificate is installed correctly by visiting the site in your web browser using https instead of http or using our SSL Checker.

31 July 2018

Brother HL-2170W Offline

Brother HL-2170W Offline

In 'Devices and Printers', right-click 'Brother HL-2170W', click 'See what's printing'.
Click 'Printer' in the menu.
Look at 'Use Printer Offline'. There is a tick mark against it.
Clear the tick mark.
Brother HL-2170W will become online.

24 July 2018

How to convert mp4 videos into flv ones with ffmpeg?

How to convert mp4 videos into flv ones with ffmpeg?

I'm late, but if this can help somebody, it's time well spent.
If I understand correctly, you want to convert MP4 to FLV using FFMPEG. Here are two command lines to help you do that; I'm currently using them myself (you can adjust them to your needs too) :
ffmpeg -i source.mp4 -c:v libx264 -crf 19 destinationfile.flv
and if the first one doesn't work :
ffmpeg -i source.mp4 -c:v libx264 -ar 22050 -crf 28 destinationfile.flv
Please note that -crf XX is the quality of the video you will create. It's between 0 and 51 (but between 17 and 23 is a reasonable range and the lower the number is, the better quality the video is going to be).
The -ar 22050 is for adjusting the audio sample range (audio quality). You can choose 11025, 22050 or 44100.
I suggest you read this Tutorial for FFMPEG . It's really complete and has many useful tips.
Hope this will help you or somebody in the same situation.

10 July 2018

Copy UNC network path (not drive letter) for paths on mapped drives from Windows Explorer

Copy UNC network path (not drive letter) for paths on mapped drives from Windows Explorer


  1. In Windows Explorer, hold the shift button down, r-click on the file, and select "Copy as path".
  2. Insert a Hyperlink in the email and paste in the address field of the Hyperlink dialogue box. (Shortcut: ctrl-K ctrl-V + OK). At this point, the link will display the mapped drive letter as the root (Q:\foo.doc).
  3. Now, r-click and select "Edit Hyperlink..." you will notice that the Address field has been translated back into the full UNC path (\\cartman\users\emueller\foo.doc). With your mouse in the Address field, hit ctrl-A and ctrl-C to copy the full path to your clipboard, then move your cursor to the top field ("Text to Display:") hit ctrl-A and ctrl-V to display it correctly in your email.

31 May 2018

How to resize videos

How to resize videos?

https://www.ffmpeg.org/download.html

Keeping the Aspect Ratio

If we'd like to keep the aspect ratio, we need to specify only one component, either width or height, and set the other component to -1. For example, this command line:
ffmpeg -i input.jpg -vf scale=320:-1 output_320.png
will set the width of the output image to 320 pixels and will calculate the height of the output image according to the aspect ratio of the input image. The resulting image will have a dimension of 320⨉207 pixels.

29 May 2018

How to update Canon multi-function printer driver?

How to update Canon multi-function printer driver?

1. Download Canon UFRII Setup Driver; Unzip it.
2. Go to 'Printer properties' -> 'Advanced'. Click 'New driver' button;
3. Click 'Have disk'. Browse to the driver file;
4. Choose the correct driver.
5. Follow the instructions, and done.

26 April 2018

A video can be watched in Chrome but not in IE, or in IE but not in Chrome

A video can be watched in Chrome but not in IE, or in IE but not in Chrome


1   <video width="480" height="300" controls autoplay>
2    <source src="https://app.cicscanada.com/video/english/homepage/cics_50th_anniversary_gala.mp4" type="video/mp4" />
3   <object classid="clsid:d27cdb6e-ae6d-11cf-96b8-444553540000" width="480" height="300">
4    <!--[if !IE]>-->
5    <object type="application/x-shockwave-flash" data="http://app.cicscanada.com/video/player/player.swf" width="480" height="300">
6    <!--<![endif]-->
7    <param name="movie" value="http://app.cicscanada.com/video/player/player.swf" />
8    <param name="wmode" value="transparent" />
9    <param name="bgcolor" value="#FFFFFF" />
10   <param name="quality" value="high" />
11   <param name="allowFullScreen" value="true" />
12   <param name="allowscriptaccess" value="always" />
13   <a href="http://www.adobe.com/go/getflash">
14   <img src="http://www.adobe.com/images/shared/download_buttons/get_flash_player.gif" alt="Get Adobe Flash player" />
15   </a>
16   <param name="flashvars" value="vdo=/video/english/homepage/cics_50th_anniversary_gala.flv&amp;autoplay=true" />
17   <!--[if !IE]>-->
18   </object>
19   <!--<![endif]-->
20   </object>
21  </video>

IE plays flv, while Chrome plays mp4.

Line #16 is for IE. You should not put 'https://app.cicscanada.com' before the file path '/video/english/homepage/...', otherwise, IE would not play the video.

Line #2 is for Chrome. You have to put 'https://app.cicscanada.com' before the file path '/video/english/homepage/...', otherwise, Chrome would not play the video.

(THE END)

Can not resize video can not set width and height in Adobe Premiere

Can not resize video can not set width and height in Adobe Premiere

In 'Export Settings' -> 'Output' -> 'Crop Setting', choose 'Scale to Fit'.

Now 'Resize Video' becomes tickable.

25 April 2018

Excel: How to Troubleshoot Excel opening blank when you double-click a file icon or file name

Excel: How to Troubleshoot Excel opening blank when you double-click a file icon or file name

Excel: How to Troubleshoot Excel opening blank when you double-click a file icon or file name

Applies to: Excel 2013Excel 2010Microsoft Office Excel 2007 More


Symptoms


When you double-click an icon or file name for a Microsoft Excel workbook, Excel starts but displays a blank screen where you expect the file to appear.


Resolution


To resolve this problem, try the following methods, as appropriate, in the given order.


Method 1: Ignore DDE

This problem may occur if the Ignore other applications that use Dynamic Data Exchange (DDE) check box in Excel options is selected.

When you double-click an Excel workbook in Windows Explorer, a dynamic data exchange (DDE) message is sent to Excel. This message instructs Excel to open the workbook that you double-clicked.

If you select the "Ignore" option, Excel ignores DDE messages that are sent to it by other programs. Therefore, the DDE message that is sent to Excel by Windows Explorer is ignored, and Excel does not open the workbook that you double-clicked.

To correct this setting, follow these steps:
  1. On the Tools menu, click Options.
  2. Click the General tab.
  3. Clear the Ignore other applications that use Dynamic Data Exchange (DDE) check box, and then click OK.
Note For more information about how to turn off DDE, see the following Microsoft Knowledge Base article:

211494 "There was a problem sending the command to the program" error in Excel
If these steps do not resolve the problem, go to Method 2.

Method 2: Repair User Experience Virtualization (UE-V)

If you are running Update User Experience Virtualization (UE-V), install hotfix 2927019. To do this, see the following Microsoft Knowledge Base article:

2927019 Hotfix Package 1 for Microsoft User Experience Virtualization 2.0
If you are not sure whether you are running UE-V, examine the program list in the Programs and Features item in Control Panel. An entry for “Company Settings Center” indicates that you are running UE-V.

If these steps do not resolve the problem, go to Method 3.

Method 3: Reset file associations

To check whether the file associations in the system are performing correctly, reset the Excel file associations to their default settings. To do this, follow the steps for your operating system.

Windows 8
  1. On the Start screen, type Control Panel.
  2. Click or tap Control Panel.
  3. Click Default Programs, and then click Set your default programs.
  4. Click Excel, and then click Choose default for this program.
  5. On the Set Program Associations screen, click Select All, and then click Save.
Windows 7
  1. Click Start, and then click Control Panel.
  2. Click Default Programs.
  3. Click Associate a file type or protocol with a specific program.
  4. Select Microsoft Excel Worksheet, and then click change program.
  5. Under Recommended Programs, click Microsoft Excel.
  6. If Excel does not appear in this list, click Browse, locate the Excel installation folder, click Excel.exe, and then click Excel.
If these steps do not resolve the problem, go to Method 4.

Method 4: Repair Office

Try to repair your Office programs. To do this, follow the steps for your installation type and operating system.
For an Office 365 Click-to-Run installation
Windows 8
  1. On the Start screen, type Control Panel.
  2. Click or tap Control Panel.
  3. Under Programs, click or tap Uninstall a program.
  4. Click or tap Microsoft Office 365, and then click or tap Change.
  5. Click or tap Online Repair, and then click or tap Repair. You may have to restart your computer after the repair process is finished.
Windows 7
  1. Click Start, and then click Control Panel.
  2. Double-click Programs and Features.
  3. Click Microsoft Office 365, and then click Change.
  4. Select Online Repair, and then click Repair.

    Note You may have to restart your computer after the repair process is complete.

    Office repair
For an Office 2013, Office 2010, or Office 2007 installation
To repair Office 2013, Office 2010, or Office 2007, follow the steps in the following Office website topic:

If these steps do not resolve the problem, go to Method 5.

Method 5: Turn off add-ins

Excel and COM add-in programs can also cause this problem. These two kinds of add-ins are located in different folders. For testing, disable and isolate the conflict by turning off each add-in one at a time. To do this, follow these steps:
  1. On the File menu, click Options, and then click Add-Ins.
  2. In the Manage list at the bottom of the screen, select COM Add-Ins item, and then click Go.
  3. Clear one of the add-ins in the list, and then click OK.
  4. Restart Excel by double-clicking the icon or file name for the workbook that you are trying to open.
  5. If the problem persists, repeat steps 1-4, except select a different add-in in step 3.
  6. If the problem persists after you clear all the COM Add-ins, repeat steps 1-4, except select Excel Add-Ins in step 2, and then try each of the Excel add-ins one at a time in step 3.
If Excel loads the file, the add-in you last turned off is causing the problem. If this is the case, we recommend that you visit the manufacturer's website for the add-in to learn whether an updated version of the add-in is available. If a newer version of the add-in is not available, or if you don’t have to use the add-in, you can leave it turned off.

If Excel does not open the file after you turn off all the add-ins, the problem has a different cause.

If these steps do not resolve the problem, go to Method 6.

Method 6: Disable hardware acceleration

disable hw accel
To work around this problem, disable hardware acceleration until a fix is released by your video card manufacturer. Make sure to check regularly for updates to your video card driver.

To disable hardware acceleration, follow these steps:
  1. Start any Office 2013 program.
  2. On the File tab, click Options.
  3. In the Options dialog box, click Advanced.
  4. In the list of available options, select the Disable hardware graphics acceleration check box.

    The following screen shot shows this option in Excel.
  5. Click OK.
Note For more information about hardware acceleration, see the following Microsoft Knowledge Base article:

2768648 Performance and display issues in Office 2013 client applications
If you still experience this problem after you try all these methods, contact Microsoft Support for additional troubleshooting help.

30 March 2018

Remotely Enable Remote Desktop

Remotely Enable Remote Desktop


Remotely enable Remote Desktop in Windows 7

Overcoming firewall obstacles

Windows 7 doesn’t allow Remote Desktop connections by default – this has to be enabled by the user (or set via group policy). What happens if you’re in a bind and need quick remote access to a desktop? If you’re in a domain environment you may just be in luck. There are four steps needed to remotely enable RDP connections.
  1. Open ports in the Windows firewall
  2. Start the Remote Registry service
  3. Change a registry setting to enable Remote Desktop
  4. Start the Remote Desktop service
For this guide I assume you are on the same LAN as the remote computer you want to access (you may already have RDP’ed into a server on that LAN), and you are logged in as a Windows user with administrative privileges for the remote computer you are wishing to access.
This isn’t likely to work work if you are on the other side of an agressive firewall.
Note: If you have access to the computer, you can follow the standard procedure for enabling Remote Desktop.

Step 1: Open ports in the Windows firewall

There is no native way to change the settings of a remote Windows firewall. However, you can use PsExec from SysInternals to disable it or change some rules.
If you download the app and drop it into your c:\ drive, you can run this command and get command line access for that remote box.
c:\psexec \\remote_machine_name cmd
Once you have that command line open, you can run this command to disable the firewall:
netsh advfirewall set currentprofile state off
Alternatively you can run this command to allow only Remote Desktop while still leaving the rest of the firewall as is:
netsh advfirewall firewall set rule group=”remote desktop” new enable=Yes

Step 2: Start the Remote Registry service

Load up the Services MMC (Control Panel > Administrative Tools > Services), right click on “Services (Local)” and choose “Connect to another computer”. Enter the name of your remote machine and connect to it. You should now be able to find the “Remote Registry” service and start it.
Depending on your environment, this may already be running, but I have found it generally isn’t on fresh computers.

Step 3: Change a registry setting to enable Remote Desktop

It’s time to make use of the Remote Registry and actually enable RDP. Load up regedit and go to File > Connect Network Registry. Enter the name of your remote computer and connect to it. Navigate to HKEY_LOCAL_MACHINE > System > CurrentControlSet > Control > Terminal Server. Change the value of “fDenyTSConnections” to “0”.

Step 4: Start the Remote Desktop service

Go back to the Services MMC you used in Step 2. Find the service “Remote Desktop Services” and start it (or restart if it is already running).

Step 5: Connect

By this point you should be able to connect to a remote desktop session on your remote computer. Remember that only administrative users can connect to an out-of-the-box Remote Desktop setup. If you have got this far and still can’t connect, it is worth checking your firewall rules to ensure nothing is being blocked.

23 March 2018

How to associate .docx with Microsoft Word in Windows 10?

How to associate .docx with Microsoft Word in Windows 10?

Open 'File Explorer'.
Browse to the .docx file you want to open but failed.
Select it by clicking it.
Click 'Home' tab in the menu on the top.
Click the downward triangle beside 'Open'.
Click 'Choose another app'.
Click 'More apps ↓'.
If there is no 'Microsoft Word', then scroll down and click 'Look for another app on this PC'. An 'Open with...' dialogue box' pops up. Current path would be 'Windows (C:) > Program Files'.
Double-click 'Microsoft Office'.
Double-click 'Office14'.
Choose 'WINWORD.EXE'. Click 'Open' button. (Tick 'Always use this app to open .docx files'.)
Done.

21 March 2018

You cannot use Outlook to complete a Microsoft Word Mail Merge

You cannot use Outlook to complete a Microsoft Word Mail Merge


Symptoms


You use Microsoft Word to start a Mail Merge that is configured to send email messages to the recipients. However, Microsoft Outlook does not send the email messages. In some cases, you do not receive an error message. Or, you may receive the following error message:
Word could not load the e-mail envelope. This could be caused by a network connection problem or a problem with your Office installation.

Cause


If you are using Microsoft Outlook 2002, Microsoft Office Outlook 2003, or Microsoft Office Outlook 2007, this issue may occur if you install a newer version of Microsoft Office and then uninstall the newer version. This issue also occurs when you install a trial edition of a newer version of Microsoft Office.

If you are using Microsoft Outlook 2010, this issue may occur if you install the 64-bit version of Microsoft Office 2010 or of Microsoft Outlook 2010, you uninstall the 64-bit version, and then you install the 32-bit version.

Resolution


Important This section, method, or task contains steps that tell you how to modify the registry. However, serious problems might occur if you modify the registry incorrectly. Therefore, make sure that you follow these steps carefully. For added protection, back up the registry before you modify it. Then, you can restore the registry if a problem occurs. For more information about how to back up and restore the registry, click the following article number to view the article in the Microsoft Knowledge Base:
322756 How to back up and restore the registry in Windows

Outlook 2002, Outlook 2003, or Outlook 2007

To resolve this issue for Outlook 2002, for Outlook 2003, or for Outlook 2007, follow these steps:
  1. Exit all Microsoft Office applications.
  2. Start Registry Editor:
    • In Windows Vista or in Windows 7, click Startthe Start button, type regedit in the Start Search box, and then press Enter.


      User Account ControlIf you are prompted for an administrator password or for confirmation, type the password, or provide confirmation. 
    • In Windows XP, click Start, click Run, type regedit in the Open box, and then click OK.
  3. Locate and then click the following registry subkey: 
    HKEY_CLASSES_ROOT\TypeLib\{00062FFF-0000-0000-C000-000000000046}
  4. On the Edit menu, click Delete.
  5. Exit Registry Editor.
  6. Repair or reinstall the Microsoft Office program.

Outlook 2010

To resolve this issue for Outlook 2010, follow these steps:
  1. Exit all Microsoft Office applications.
  2. Start Registry Editor:
    • In Windows Vista or in Windows 7, click Startthe Start button, type regedit in the Start Search box, and then press Enter.


      User Account ControlIf you are prompted for an administrator password or for confirmation, type the password, or provide confirmation. 
    • In Windows XP, click Start, click Run, type regedit in the Open box, and then click OK.
  3. Locate and then click the following registry subkey:
    HKEY_CLASSES_ROOT\TypeLib\{00062FFF-0000-0000-C000-000000000046}\9.4\0\win64
  4. On the Edit menu, click Rename.
  5. Type BAKwin64, and then press Enter.
  6. Exit Registry Editor.
  7. Repair the Microsoft Office 2010 or Microsoft Outlook 2010 installation.
    • In Windows Vista or in Windows 7, click Startthe Start button, type programs and features in the Start Search box, and then press Enter.
    • In the list of installed programs, right-click Microsoft Office 2010 or Microsoft Outlook 2010, and then click Repair.