28 February 2017

Using Public Keys for SSH Authentication

Using PuTTYgen

Set up SSH public key authentication


Generate Key Pair

If you do not have a key pair yet, start with generating new key pair.

Configure Server to Accept Public Key

Connect to your SSH server using WinSCP with the SSH protocol, using other means of authentication than public key, e.g. typically using password authentication.
Once logged in, configure your server to accept your public key. That varies with SSH server software being used. The most common SSH server is OpenSSH.

OpenSSH

  • Navigate into a .ssh subdirectory of your account home directory. You may need to enable showing hidden files to see the directory. If the directory does not exists, you need to create it first.
  • Once there, open a file authorized_keys for editing. Again you may have to create this file, if this is your first key.
  • Switch to the PuTTYgen window, select all of the text in the Public key for pasting into authorized_keys file box, and copy it to the clipboard (Ctrl+C). Then, switch back to the editor and insert the data into the open file, making sure it ends up all on one line. Save the file.
  • Ensure that your account home directory, your .ssh directory and file authorized_keys are not group-writable or world-writable. Recommended permissions for .ssh directory are 700. Recommended permissions for authorized_keys files are 600. Read more about changing permissions.

ssh.com

  • Save a public key file from PuTTYgen, and copy that into the .ssh2 subdirectory of your account home directory.
  • In the same subdirectory, edit (or create) a file called authorization. In this file you should put a line like Key mykey.pub, with mykey.pub replaced by the name of your key file.

Other SSH Servers

For other SSH server software, you should refer to the manual for that server.

Configure WinSCP Session

When configuring session, specify path to your private key on SSH > Authentication page of Advanced Site Settings dialog.
Alternatively, load the private key into Pageant.

How do I restrict a user to a specific directory

https://www.digitalocean.com/community/questions/how-do-i-restrict-a-user-to-a-specific-directory

1). If you'll see the mini guide below, you'll be able to knock this out relatively quickly :-). This will also set you up for #2 as well, if #2 is what you're wanting.
2). SCP requires SSH, so you wouldn't be able to allow SCP and deny SSH. If you meant SFTP, then yes, you can deny SSH access and still allow SFTP.
--
First thing, launch PuTTy, Terminal or your preferred application to access your Droplet and login as either root or your sudo user.
--
1). First, we need to create a new group for SFTP users. To this group, we add users that will be able to connect to SFTP. Only users added to this group will be able to SFTP in to your server (of course, this does not limit the root user -- you do not want to add root to this group, nor modify the root user at all). To do this, we'll use the following command:
groupadd sftpusers
You can, of course, choose another group name if you'd like. The name of the group doesn't have to be sftpusers (it could be anything, as long as the group does not already exist).
--
2). Now that we have our SFTP group, we can use the following command to add new users to that group, thus, once we're done, allowing them to use SFTP.
useradd -g sftpusers -d /path/to/users/home -s /sbin/nologin username```
-g specifies the group name (referencing the group we just created in #1).
-d specifies the users home directory (i.e. /home/username/htdocs/ for example)
-s specifies shell access (/sbin/nologin means SSH is disabled for this user, as it should be)
The last part of the command, username, is the username of the user you'd like to add. So, for example, if I wanted to create a new user by the name of exampleuser, and a directory of /home/exampleuser/htdocs/, I'd run:
useradd -g sftpusers -d /home/exampleuser/htdocs/ -s /sbin/nologin exampleuser
--
3). Verify the user by checking /etc/passwd. The newly created user should appear the bottom of the list.
grep exampleuser /etc/passwd
--
4). If you'd like to modify an existing user, we can use the following command:
usermod -g sftpusers -d /path/to/users/home -s /sbin/nologin existinguser
Simply change -d to the users home directory and existinguser to the user you wish to modify.
--
5). We now need to modify our SSH Configuration to allow SFTP (as this is often no enabled by default, at least for users other than root). To do this, we need to load up our SSH configuration file.
sudo nano /etc/ssh/sshd_config
If you see:
Subsystem      sftp    /usr/libexec/openssh/sftp-server
Comment it out like so:
#Subsystem      sftp    /usr/libexec/openssh/sftp-server
If that line does not exist, simply add the following to the end of the file:
Subsystem sftp internal-sftp
    Match group sftpusers
    ChrootDirectory %h
    ForceCommand internal-sftp
What this does is set SSH to allow SFTP, requires that the users usergroup match sftpusers, sets the SFTP directory to their specified home directory (the one we set when we either created or modified the user) and forces the use of the internal SFTP server. This prevents us from having to use another piece of software to handle SFTP.
Now we need to restart SSH by issuing:
sudo service ssh restart
--
6). Now that we have everything setup, we need to make one final modification to the permissions we have set on our directories (this would need to be done for each user).
For this example, I'll use the home directory I referenced above
/home/exampleuser/htdocs/
For SFTP to properly work, we need to make sure all the sub-directories under the home directory is owned by the user and group we just set, everything else (including the home directory) needs to be owned by root. So if we set our home directory to the above, we need to run:
chown -R examplegroup:sftpusers /home/exampleuser/htdocs/public_html
You can verify the ownership changing over to /home/exampleuser/htdocs/
cd /home/exampleuser/htdocs/
and running
ls -al
--
So you should see the following ownership when running the ls -al command:
root:root /home/
root:root /home/exampleuser/
root:root /home/exampleuser/htdocs/

exampleuser:sftpusers /home/exampleuser/htdocs/public_html
If that's what you see, you should now be able to SFTP in as exampleuser using your Droplet IP and the password you set for this user. If you've not yet set a password, you can use the passwd command from the CLI:
passwd exampleuser
and you'll be prompted to set a password.
--
If you need any help or are confused by any of the above, just let me know and I'll be more than happy to help!

Access privilege of home directory and all above MUST be 755 or 750.

For the permissions here are the ls-al lines:
/var :
drwxr-xr-x. 21 root root       4096 Nov 30 10:38 var
/var/www :
drwxr-xr-x  10 root root 4096 Nov 30 10:55 www
/var/www/www.brianjeon.com
drwxr-xr-x 3 root root 4096 Nov 29 13:06 www.brianjeon.com
/var/www/www.brianjeon.com/public_html
drwxr-xr-x 2 brianjeon sftpusers  4096 Nov 29 17:59 public_html
27 February 2017

How to turn your Windows 10 PC into a wireless hotspot

http://www.windowscentral.com/how-turn-your-windows-10-pc-wireless-hotspot

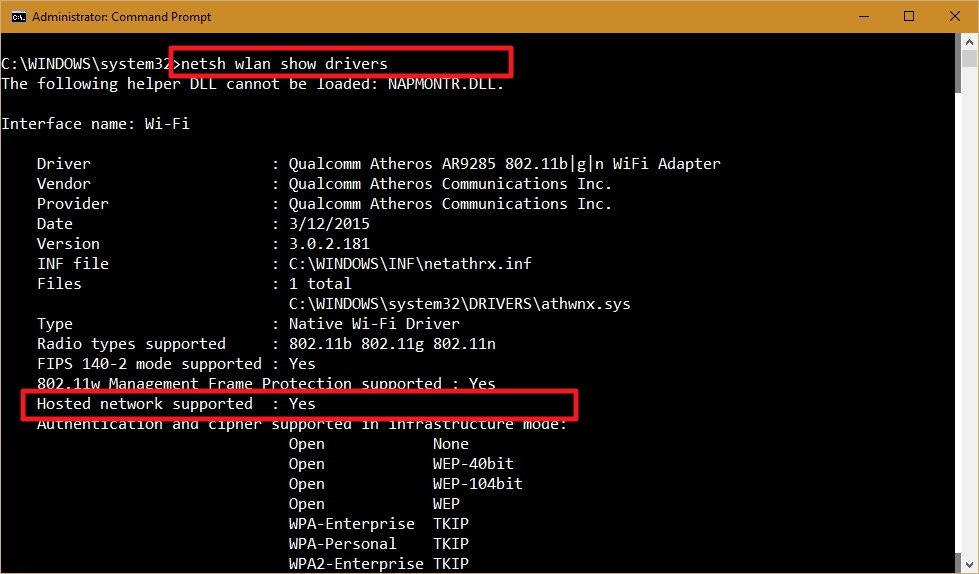
How to check if your wireless adapter supports Hosted Networks in Windows 10

While some adapters include support for Hosted Network, you will first need to verify your computer's physical wireless adapter supports this feature using the following command:
NETSH WLAN show drivers
If the generated output shows Hosted network supported: Yes, then you can continue with the guide. If your wireless adapter isn't supported, you could try using a USB wireless adapter that supports the feature.

How to create a wireless Hosted Network in Windows 10

Creating a wireless hotspot in Windows 10 is relatively straightforward — don't let the command line scare you. Simply follow the steps below to configure a wireless Hosted Network:
  1. While in Command Prompt (Admin) enter the following command:
    NETSH WLAN set hostednetwork mode=allow ssid=Your_SSID key=Your_Passphrase
    Where the SSID would be the name you want to identify your wireless network when trying to connect a new device, and the passphrase is the network security key you want users to use to connect to your network. (Remember that the passphrase has to be at least 8 characters in length.)
  2. Once you created a Hosted Network, enter the following command to activate it:
    NETSH WLAN start hostednetwork

How to share your internet connection with a Hosted Network in Windows 10

Up to here, you created and started a Hosted Network in your Windows 10 PC. However, any wireless capable device won't be able to access the internet just yet. The last thing you need to do is to share an internet connection using the "Internet Connection Sharing" feature from a physical network adapter.
  1. Use the Windows key + X keyboard shortcut to open the Power User menu, and select Network Connections.
  2. Next, right-click the network adapter with an internet connection – this could be a traditional Ethernet or wireless network adapter — select Properties.
    Note: In Network Connections, you should now see a new our new Microsoft Hosted Virtual Adapter which is labeled Local Area Connection* X, and with the SSID name.
  3. Click the Sharing tab.
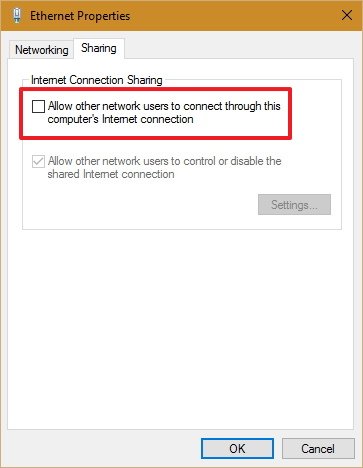
  4. Check the Allow other network users to connect through this computer's Internet connection option.
  5. Next, from the Home networking connection drop-down menu select the Microsoft Hosted Virtual Adapter.
  6. Click OK to finish.
At this point, you should be able to see and connect any wireless capable device to the newly created software access point, and with access to the internet.

How to stop sharing an internet connection with other devices in Windows 10

If you want to temporary stop allowing other devices to connect wirelessly through your computer, you can type the following command in the Command Prompt and hit Enter:
NETSH WLAN stop hostednetwork
At any time, you can just use the start variant of the command to allow other devices to connect to the internet using your computer as an access point without extra configuration:
NETSH WLAN start hostednetwork
Similarly, you can also use the following command to enable or disable a wireless Hosted Network:
NETSH WLAN set hostednetwork mode=allow
NETSH WLAN set hostednetwork mode= disallow

How to change a Hosted Network settings in Windows 10

In the case you want to change some of the current settings, such as SSID or network security you can use the following commands:
NETSH WLAN set hostednetwork ssid=Your_New_SSID
NETSH WLAN set hostednetwork key=Your_New_Passphrase

How to view the current Hosted Network settings

There are two commands to view the Hosted Network settings on your computer:
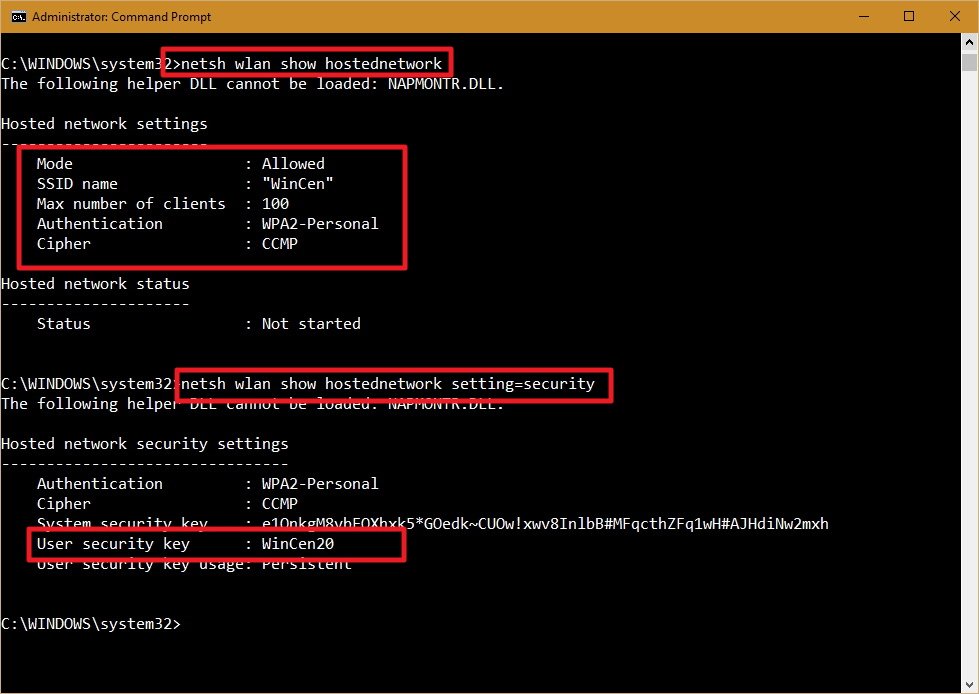
The following command shows the mode and SSID name in use, max number of clients that can connect, type of authentication, and cipher:
NETSH WLAN show hostednetwork
And the following command will also reveal the current network security key among other settings, similar to the previous command:
NETSH WLAN show hostednetwork setting=security

How to disable a wireless Hosted Network in Windows 10

While the setup of a wireless Hosted Network in Windows 10 is not very complicated, Microsoft doesn't make very straightforward to remove the configurations when you no longer need the feature.
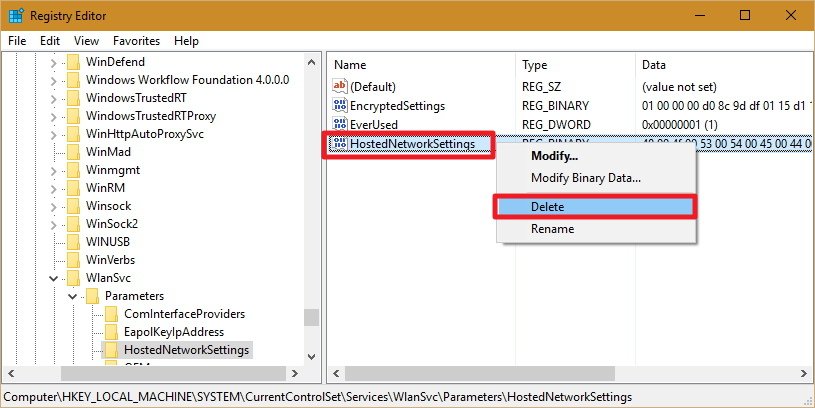
Although you can use the stop or disallow commands, these actions won't eliminate the settings from your computer. If you want completely delete the Hosted Network settings in Windows 10, you'll need to modify the Registry.
Important: Before you change anything settings on your computer, it's worth noting that editing the Windows Registry can be a dangerous game that can cause irreversible damages to your system if you don't know what you are doing. As such, it's recommended for you to make a full backup of your system or at least System Restore Point before proceeding with this guide. You have been warned!
  1. Open the Start menu, do a search for regedit, hit Enter, and click OK to open the Registry with admin rights.
  2. Scroll down the following path in the Registry:
    HKEY_LOCAL_MACHINE\system\currentcontrolset\services\wlansvc\parameters\hostednetworksettings
    Right-click the HostedNetworkSettings DWORD key, select Delete, and click Yes to confirm deletion.
  3. Restart your computer
  4. Open to the Command Prompt and use the following command:
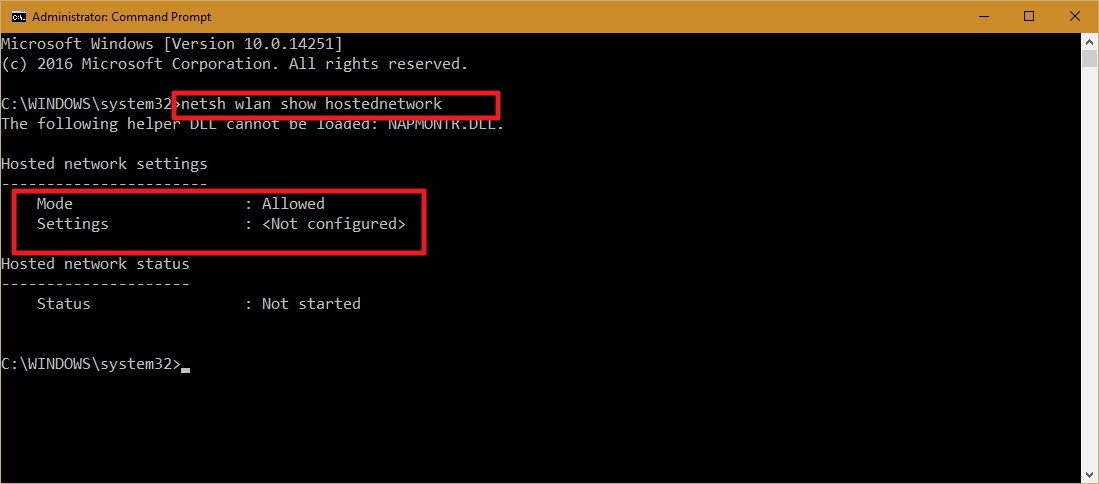
    NETSH WLAN show hostednetwork
    You will know that you have successfully deleted the settings when the Settings field reads Not configured.
  5. Make sure you turn off "Internet Connection Sharing" in the physical network adapter that was sharing the internet with other devices. Use the Windows key + X keyboard shortcut to open the Power User menu, and select Network Connections.
  6. Right-click the network adapter, and select Properties.
  7. Click the Sharing tab.
  8. Uncheck the Allow other network users to connect through this computer's Internet connection option.
  9. Click OK to complete the process.

Things you need to know

Although the wireless Hosted Network feature in Windows 10 allows you to implement an access point solution to share an internet connection with other devices, it's not meant to be a solution to replace a physical wireless access point.
Also, there are a few things you want to consider. For example, wireless speeds will dramatically be reduced compared to the rates provided from a physical access point. Perhaps it would not be a big deal for internet browsing, but downloading or transferring big files could be an issue for some users.
You also need to consider that your computer needs to be always turned on to act as a wireless access point. If the computer enters into sleep, hibernate, or restarts, your wireless hotspot will stop working, and you will need to start manually the feature using the NETSH WLAN start hostednetwork command.
You cannot run a SorftAP and ad hoc at the same time on Windows. If you need to create a temporary network connection between two computers, setting up ad hoc will turn off SoftAP — you can run one or the other, not both at the same time.

Wrapping things up

Wireless Hosted Network is a nifty feature in Windows can be a great tool to have for when you need to create a wireless access point on the go. It won't match the performance of a physical wireless access point, but it can be useful for many unexpected scenarios — like having one wired ethernet connection and several devices you want to get online. It's not a replacement for the real thing, but in a sticky situation, it can be just the fix you need.

22 February 2017

Restrict SFTP (SSH) users to home folder

https://bensmann.no/restrict-sftp-users-to-home-folder/

Here is a guide for setting up SFTP users who’s access is restricted to their home directory.
Add the following to the end of the /etc/ssh/sshd_config file:
Subsystem sftp internal-sftp

# This section must be placed at the very end of sshd_config
Match Group sftponly
    ChrootDirectory %h
    ForceCommand internal-sftp
    AllowTcpForwarding no
This means that all users in the ‘sftponly’ group will be chroot’d to their home directory, where they only will be able to run internal SFTP processes.
Now you can create the group sftponly by running the following command:
$ groupadd sftponly
Set a user’s group:
$ usermod steve -g sftponly
To deny SSH shell access, run the following command:
$ usermod steve -s /bin/false
And set the user’s home directory:
$ usermod steve -d /folder
Finally, you probably need to restart SSH
$ service ssh restart
The SSH part should now be in order, but you should make sure that file permissions also are correct. If the chroot environment is in a user’s home directory both /home and /home/username MUST be owned by root and should have permissions along the lines of 755 or 750.
In other words, every folder leading up to and including the home folder must be owned by root, otherwise you will get the following error after logging in:
Write failed: Broken pipe
Couldn't read packet: Connection reset by peer

06 February 2017

How to log in with root in Ubuntu?

How to log in with root in Ubuntu?

Simulate a root environment. If you are an advanced user who needs access to an actual root shell to run specific scripts, simulate a root shell with sudo –i. This command will give you superuser access with root’s environment variables.[3]
  • Enter the command sudo passwd root. This will create a password for root, essentially “enabling” the account. Don't forget this password.
  • Type sudo -i. Enter the root password when prompted.
  • The prompt will change from $ to #, indicating you have root access.